This lab adds a strip of colorful LEDs to your robot. You will program the lights to change color based on what the robot is doing. Let's make your robot shine!
This robot takes the base robot and adds an LED (Light-Emitting Diode) strip arranged in a 12×6 pixel grid. The LEDs display colors and patterns based on what the robot is sensing and doing. For example, a moving rainbow pattern sweeps across the top when the robot drives forward, and the direction reverses when the robot backs up.
The LED strip is easy to connect — it only needs three wires: power, ground, and a data wire.
You can also use longer LED strips and program your own patterns.
Part 1: Ordering the LED Strip
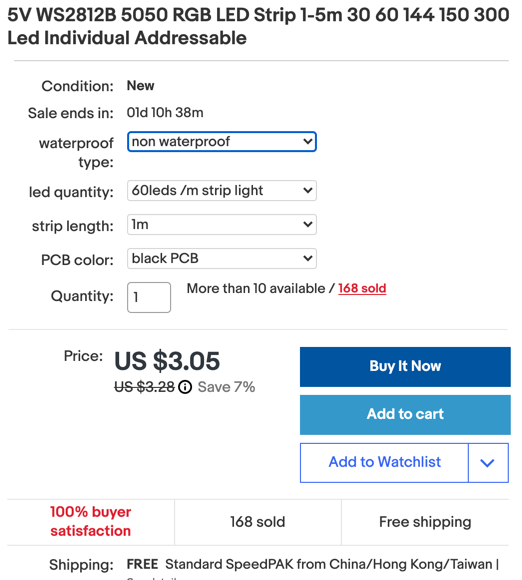
LED strips come in many lengths, densities, and packaging types. We use 1-meter strips with 60 LEDs per meter. These strips are easy to cut and solder. We like the black background strips. They come in three packaging options:
No waterproofing — fine for indoor robots
IP65 waterproofing — the strip is coated in silicone rubber to protect it from moisture and dust
Full waterproofing — the strip is sealed inside a flexible rubber sleeve
Waterproofed strips cost a little more, but they protect the tiny circuits on the strip better. Note: waterproofing does not mean the strip can be put under water.
You can buy a $3 strip of 60 LEDs and cut it into six pieces of 10 LEDs each. That works out to about 50 cents per segment. Solder short wires to each segment, then add solid 22-gauge wire so the segments plug easily into your breadboard.
Key Idea
These LED strips are called NeoPixels (a name from Adafruit) or WS2812B LEDs (the manufacturer's name). They are addressable, which means you can set the color of each LED separately using just one data wire.
Connecting the LED Strips
Wire the LED strip to the Pico. Connect the center pin of the strip connector to Pico pin 0 (upper left corner when the USB port faces up). Connect the GND wire to the ground rail on the breadboard. Connect the 5V wire to the 5-volt power rail.
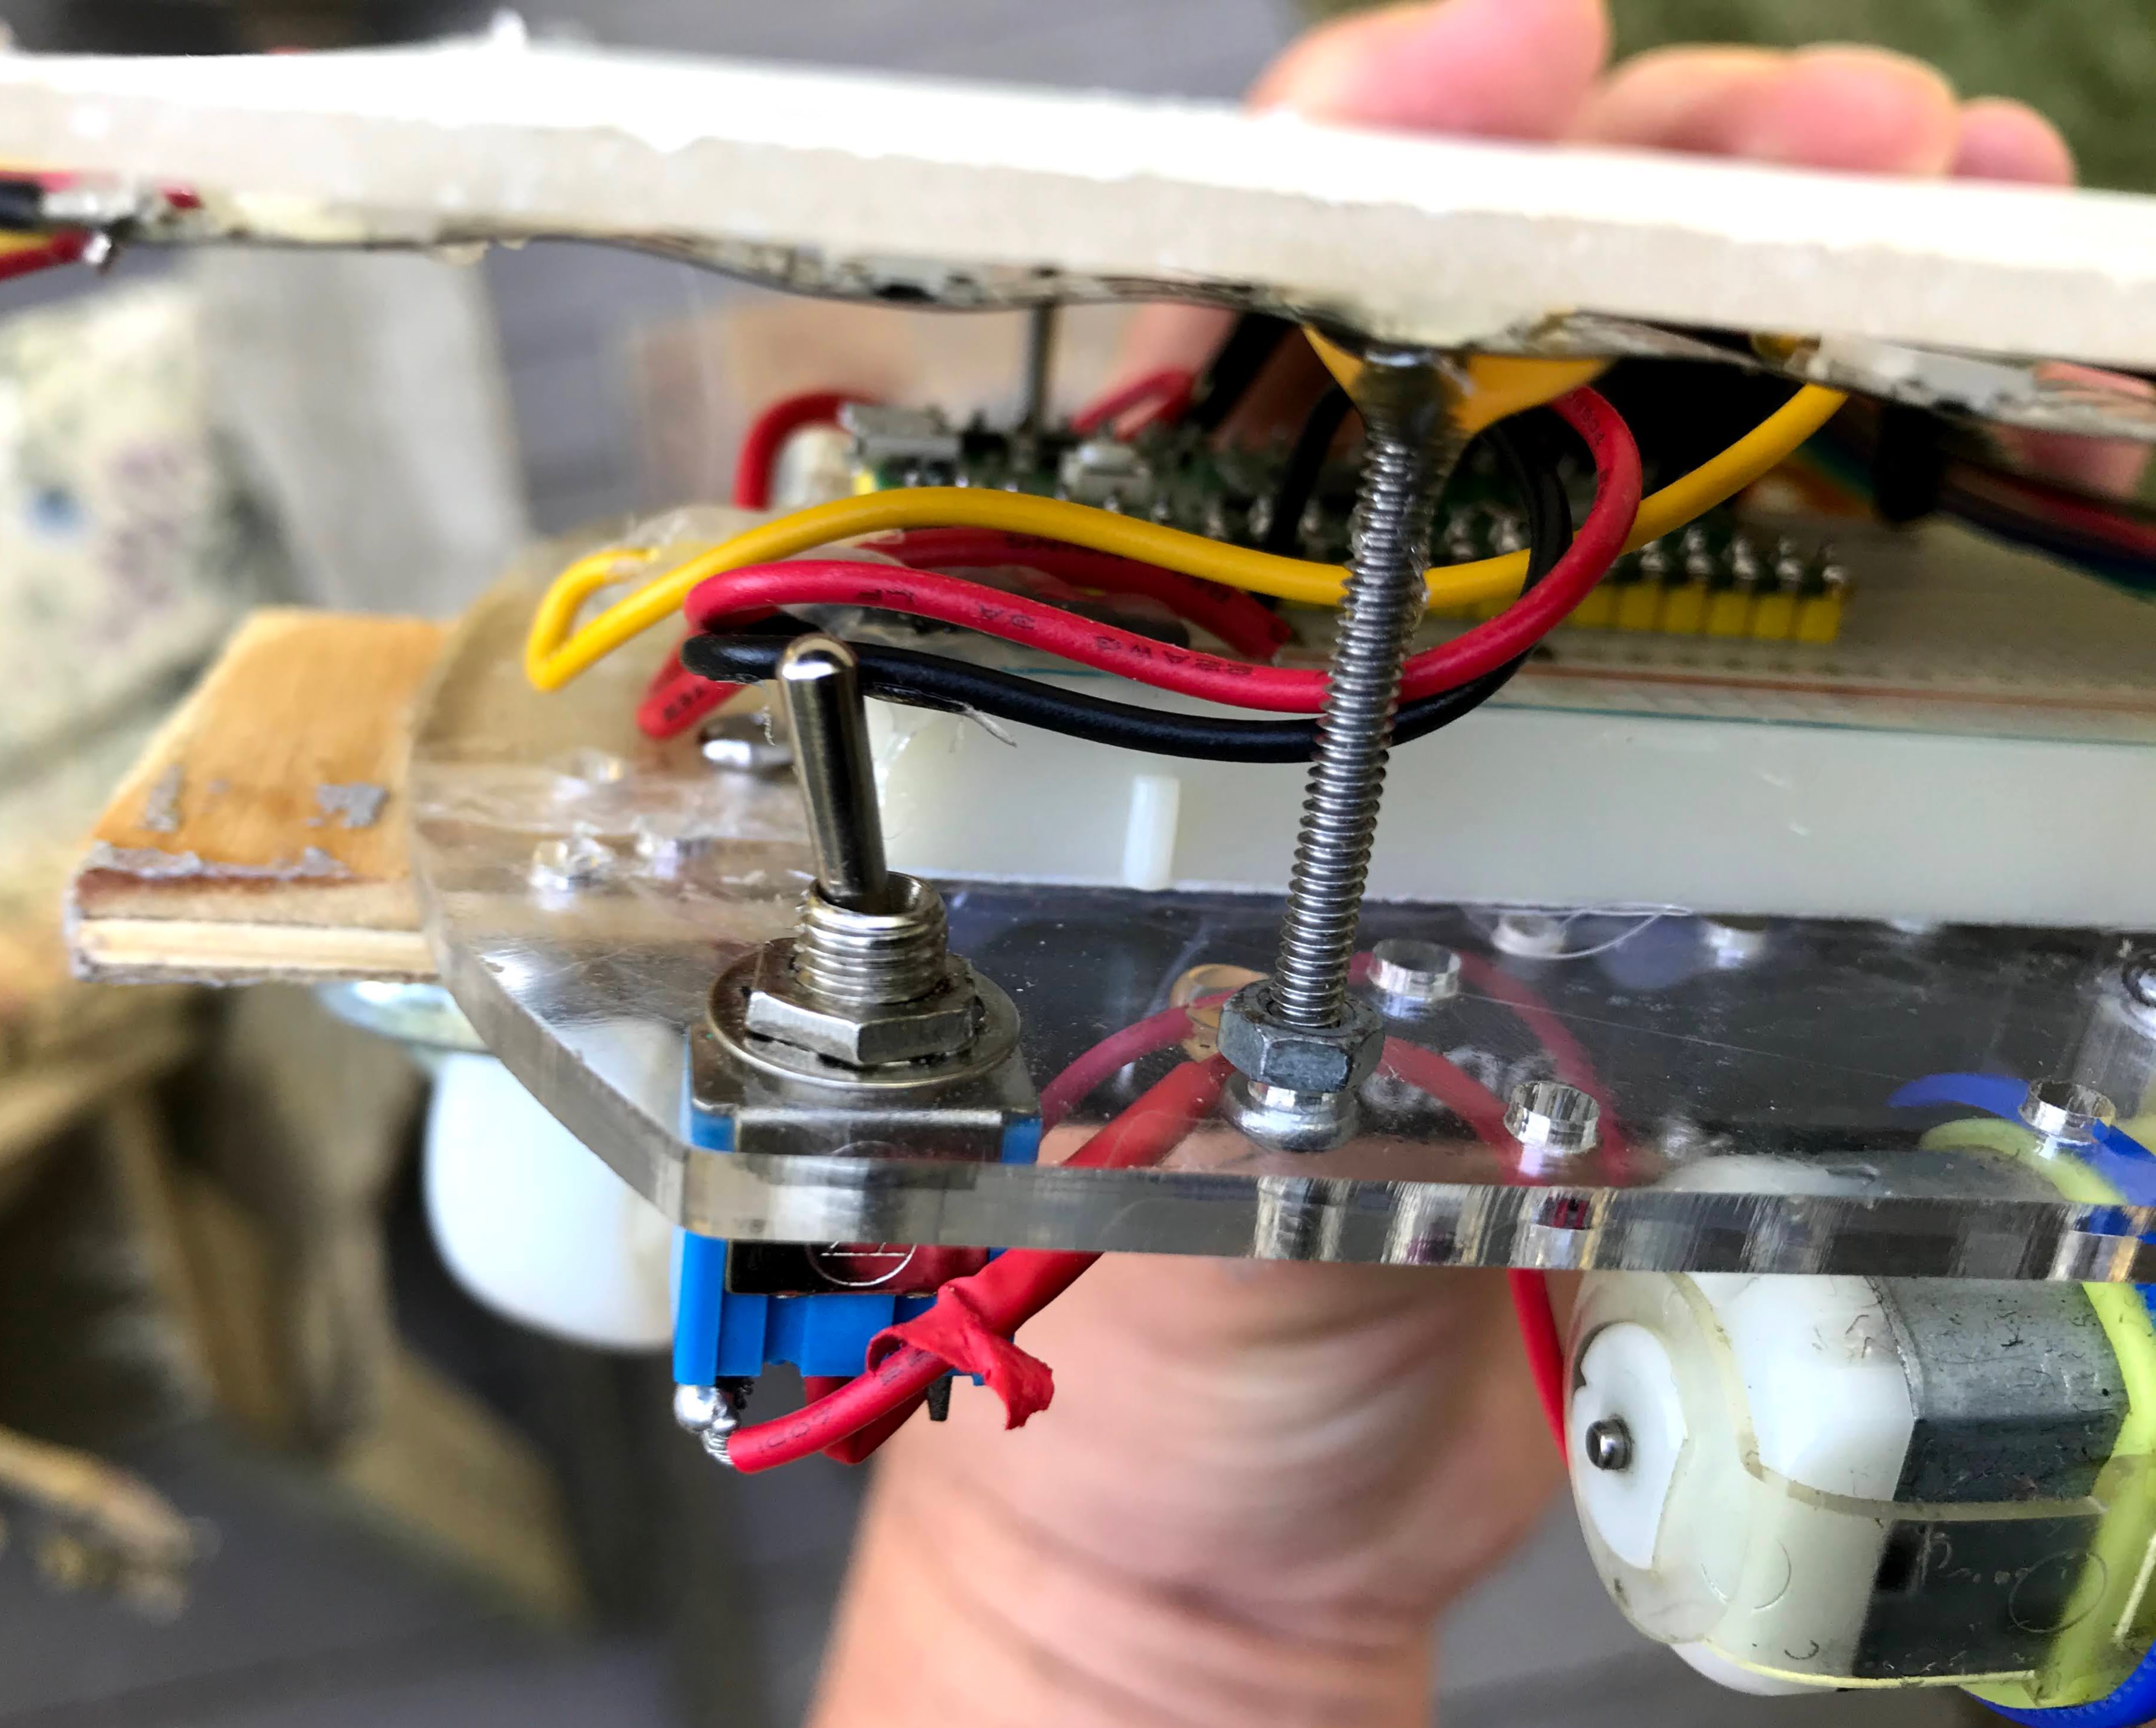
Adding a Standoff
A standoff is a small metal or plastic spacer. Use standoffs to lift the LED grid above the chassis so the wires have room underneath.
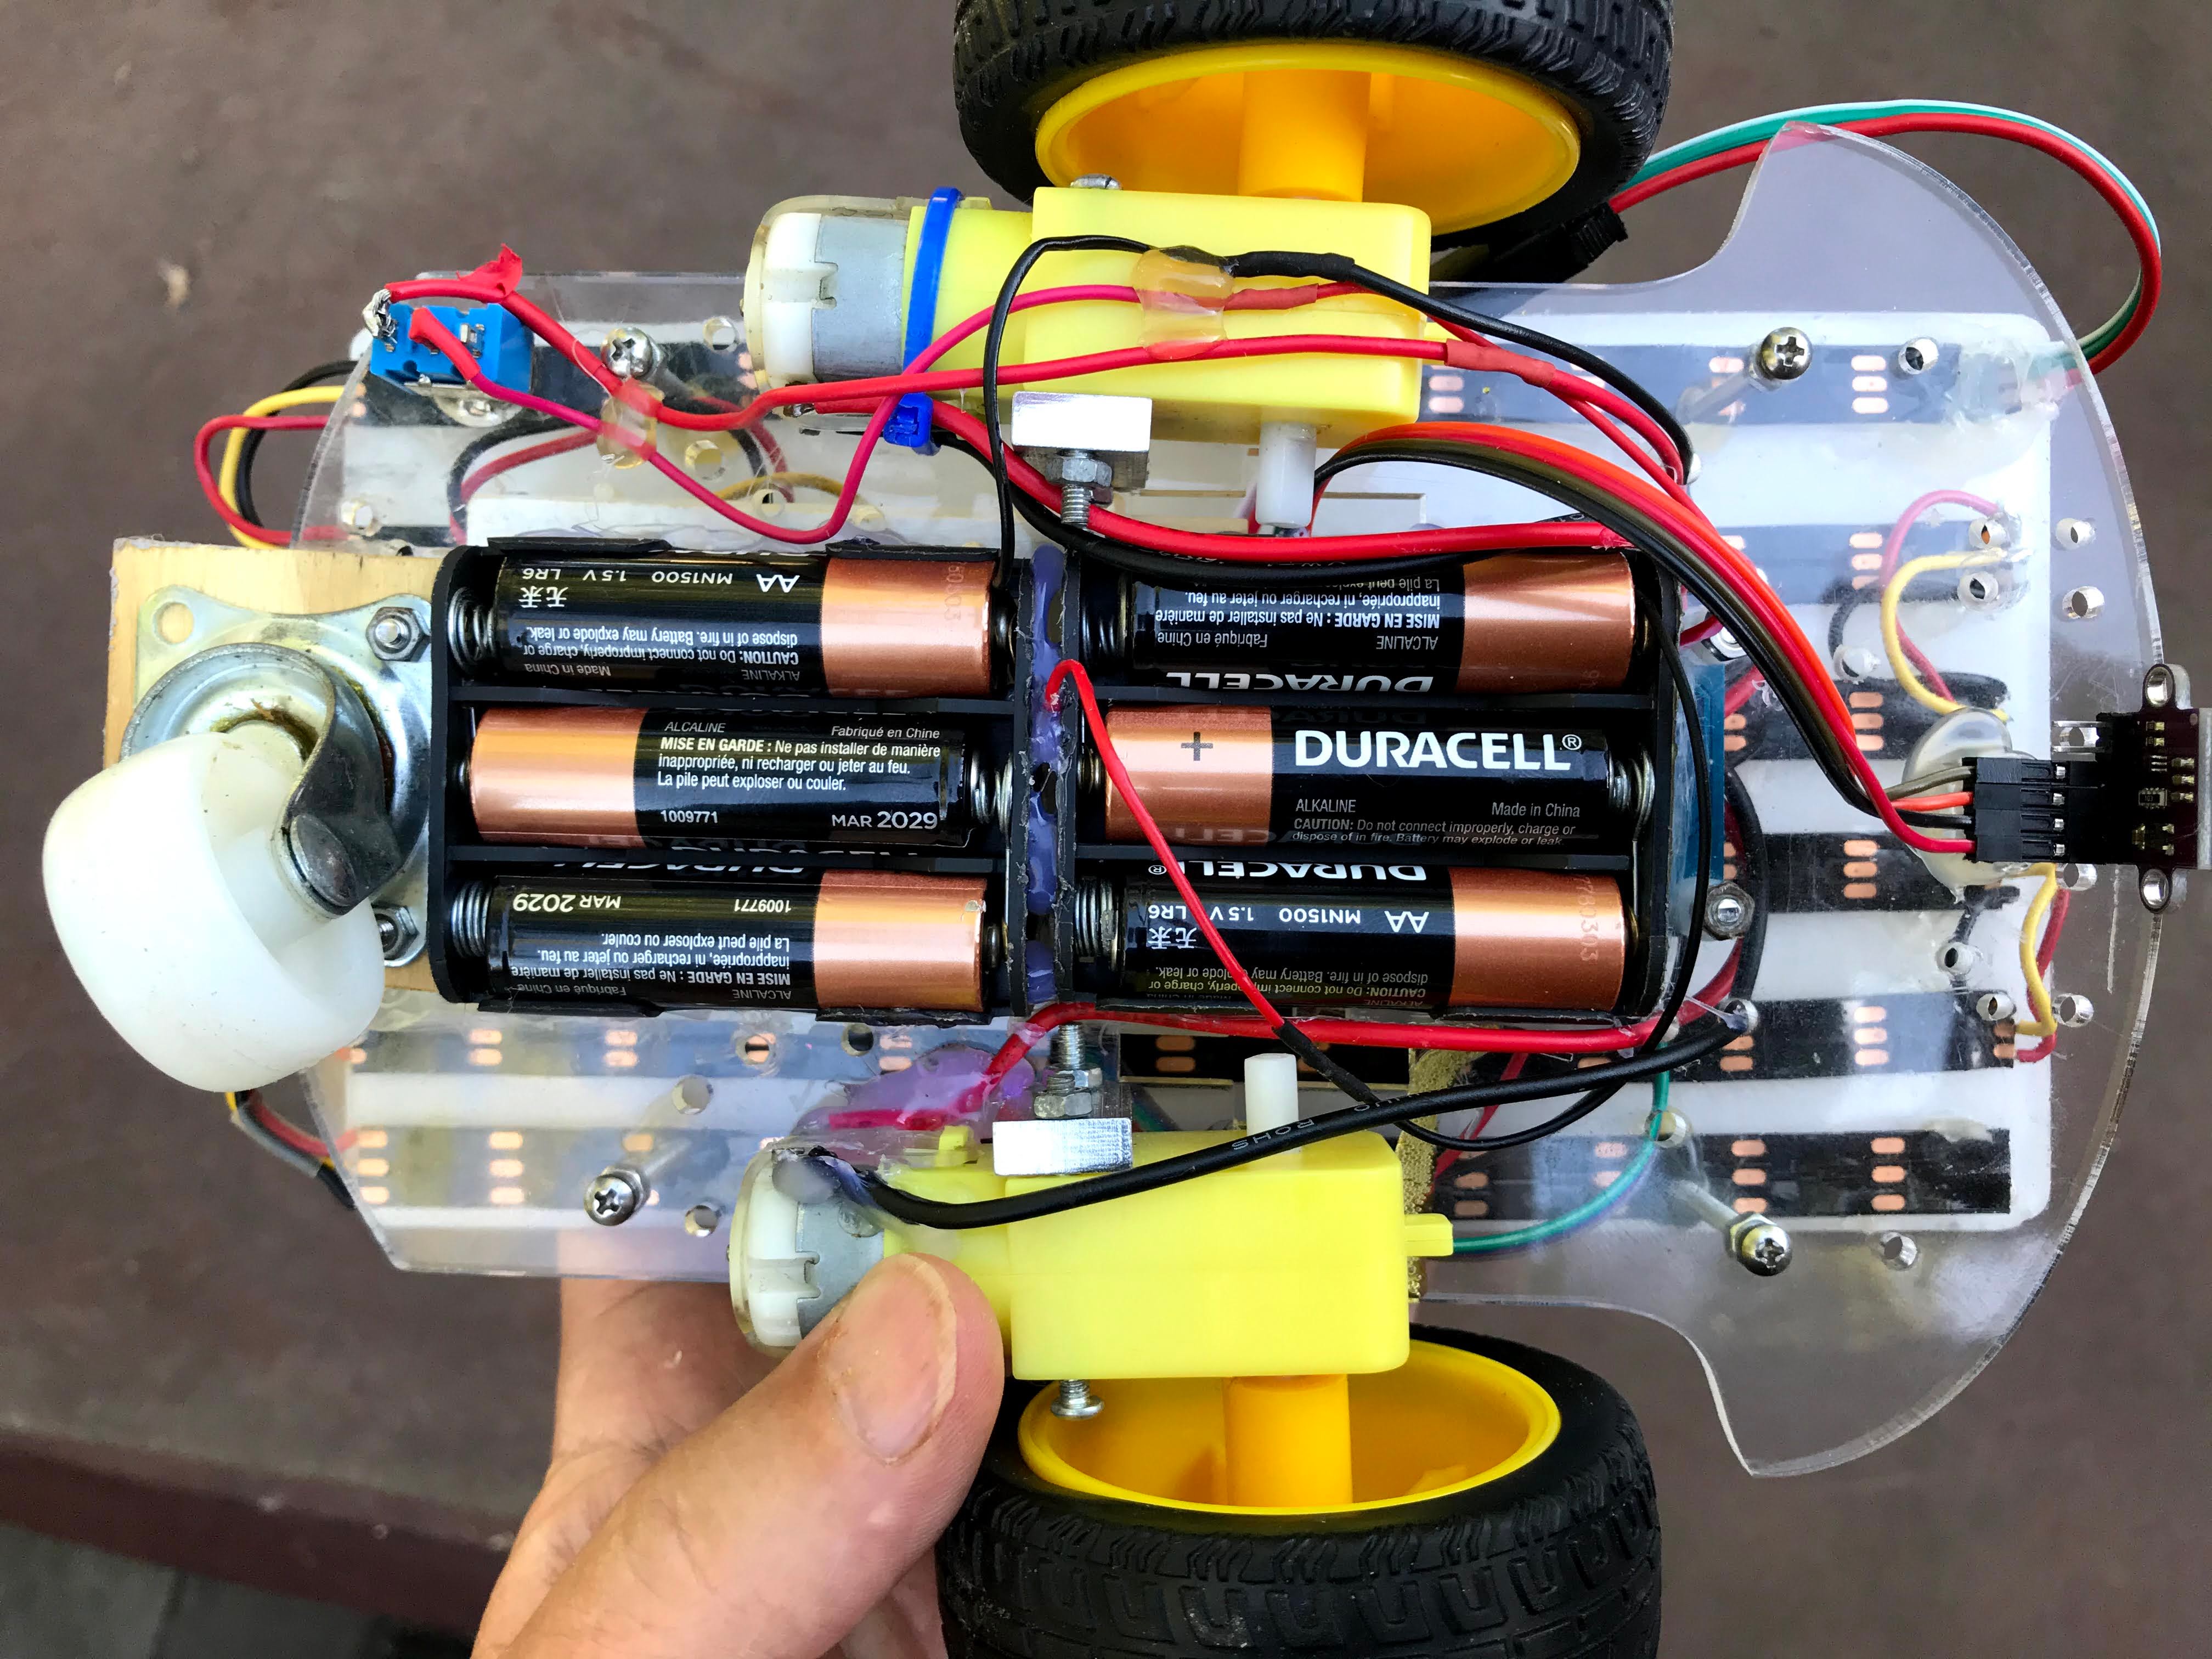
Upgrading to 9 Volt Power
The base robot uses a 6-volt battery pack (four AA batteries). This robot has 72 RGB (Red, Green, Blue) LEDs that may draw more power. We upgrade to 9 volts by wiring two packs of three batteries together in series. Wiring batteries in series means connecting them end-to-end so their voltages add up. This lets the robot keep running even when the batteries are partly drained.
72 Pixel Configuration
Here is a top view of the LEDs shining through the clear plastic chassis top.
You can see each individual LED. If you add a diffusion layer — a thin piece of white plastic — between the LEDs and the clear top, the colors blend together into a smooth glow.
Part 2: Making the Connections
The LED strips run on 5 volts. Connect the three wires as follows:
Connect the center data wire to pin 0 on the Pico (upper left corner, USB on top).
Connect the GND wire to the ground rail on the breadboard.
Connect the 5V wire to the 5-volt power rail.
Part 3: Adding the NeoPixel Library
MicroPython includes a built-in neopixel library for basic LED strips. For the 72-pixel matrix with advanced color features, we use the Neopixel library (note the capital N). Download it and save it as neopixel.py on your Pico.
Part 4: Testing Your Code
In the first test, make the very first LED on the strip blink red. This confirms your wiring is correct.
1 2 3 4 5 6 7 8 9101112131415
importmachine,neopixel,timeLED_PIN=machine.Pin(4)# data wire connected to pin 4NUMBER_PIXELS=12# how many LEDs are on the stripnp=neopixel.NeoPixel(LED_PIN,NUMBER_PIXELS)# create the LED strip objectwhileTrue:np[0]=(255,0,0)# set the first LED to red (R=255, G=0, B=0)np.write()# send the color data to the striptime.sleep(1)# wait 1 secondnp[0]=(0,0,0)# turn the first LED off (all colors to 0)np.write()# send the updatetime.sleep(1)# wait 1 second
What each line does
neopixel.NeoPixel(LED_PIN, NUMBER_PIXELS) — creates an object that controls the strip
np[0] = (255, 0, 0) — sets LED number 0 to red using RGB color values
np.write() — sends the color settings to all LEDs at once
Functions for Drawing on the Matrix
The 72-pixel matrix is 12 columns wide and 6 rows tall. The pixel numbering zigzags. The first row goes 0–11, but the second row goes 23 down to 12 (in reverse order). This zigzag pattern is called a serpentine layout.
importtimefromneopixelimportNeopixelnumpix=72# total number of pixelsstrip=Neopixel(numpix,0,0,"GRB")# create the strip (GRB = Green-Red-Blue color order)# Define rainbow colors as RGB tuplesred=(255,0,0)orange=(255,150,0)yellow=(255,255,0)green=(0,255,0)blue=(0,0,255)indigo=(75,0,130)violet=(138,43,226)colors=(red,orange,yellow,green,blue,indigo,violet)# all 7 colors in orderstrip.brightness(255)# set brightness to maximumdefcolor_wipe():"""Fill the strip one pixel at a time with each rainbow color."""forcolorincolors:# loop through each colorforiinrange(numpix):# loop through each pixelstrip.set_pixel(i,color)# set pixel i to the current colorstrip.show()# update the displaytime.sleep(0.01)# short pause for animation effectdefcolor_wipe_2():"""Fill one column at a time with each rainbow color."""forcolorincolors:foriinrange(12):# loop through 12 columns# set the same column position in each of the 6 rowsstrip.set_pixel(i,color)strip.set_pixel(i+12,color)strip.set_pixel(i+24,color)strip.set_pixel(i+36,color)strip.set_pixel(i+48,color)strip.set_pixel(i+60,color)strip.show()time.sleep(0.01)defcolor_wipe_3():"""Fill columns while accounting for the serpentine row direction."""forcolorincolors:foriinrange(12):strip.set_pixel(i,color)# row 1 counts forwardstrip.set_pixel(23-i,color)# row 2 counts backward (serpentine)strip.set_pixel(i+24,color)# row 3 counts forwardstrip.set_pixel(47-i,color)# row 4 counts backwardstrip.set_pixel(48+i,color)# row 5 counts forwardstrip.set_pixel(71-i,color)# row 6 counts backwardstrip.show()time.sleep(0.3)defcolor_wipe_4(offset,direction):"""Draw a rainbow column pattern that can move forward or backward."""foriinrange(12):ifdirection==1:this_color=colors[(i-offset)%7]# shift colors forwardelse:this_color=colors[(i+offset)%7]# shift colors backwardstrip.set_pixel(i,this_color)strip.set_pixel(23-i,this_color)strip.set_pixel(i+24,this_color)strip.set_pixel(47-i,this_color)strip.set_pixel(48+i,this_color)strip.set_pixel(71-i,this_color)strip.show()whileTrue:forcounterinrange(100):color_wipe_4(counter%7,1)# animate the rainbow moving forwardforcounterinrange(100):color_wipe_4(counter%7,-1)# animate the rainbow moving backward
What each line does (color_wipe_4)
offset — controls which color appears first in each column
direction — 1 moves the rainbow one way, -1 moves it the other way
% 7 — wraps the offset back to 0 after it reaches 7 (there are 7 colors)
Monty's Tip
Start with strip.brightness(20) instead of 255 when filming the robot — full brightness washes out the camera. You can turn it up to 255 for normal use.
Full Source Code
This combines motor control, the distance sensor, and the LED animation. The rainbow moves forward while the robot drives forward. When the robot detects an obstacle, it backs up, the rainbow reverses direction, and the robot turns.
frommachineimportPin,PWMfromtimeimportsleepimportmachineimportVL53L0X# time-of-flight distance sensor driverfromneopixelimportNeopixel# addressable LED driver# --- Motor pins ---RIGHT_FORWARD_PIN=19RIGHT_REVERSE_PIN=18LEFT_FORWARD_PIN=20LEFT_REVERSE_PIN=21right_forward=PWM(Pin(RIGHT_FORWARD_PIN))right_reverse=PWM(Pin(RIGHT_REVERSE_PIN))left_forward=PWM(Pin(LEFT_FORWARD_PIN))left_reverse=PWM(Pin(LEFT_REVERSE_PIN))# --- Distance sensor ---sda=machine.Pin(16)scl=machine.Pin(17)i2c=machine.I2C(0,sda=sda,scl=scl)tof=VL53L0X.VL53L0X(i2c)# create the sensor objecttof.start()# wake up the sensor# --- On-board LED ---led_onboard=machine.Pin(25,machine.Pin.OUT)# --- LED strip ---numpix=72strip=Neopixel(numpix,0,0,"GRB")strip.brightness(20)# low brightness for video; raise to 255 for normal use# --- Driving parameters ---POWER_LEVEL=30000# motor speed (20000 to 65025)TURN_THRESHOLD=400# distance in mm at which the robot turnsTURN_TIME=0.25# seconds spent turningBACKUP_TIME=0.75# seconds spent backing up# --- Rainbow colors ---red=(255,0,0)orange=(255,165,0)yellow=(255,255,0)green=(0,255,0)blue=(0,0,255)indigo=(75,0,130)violet=(138,43,226)colors=(red,orange,yellow,green,blue,indigo,violet)# --- Motor control functions ---defturn_motor_on(pwm):pwm.duty_u16(POWER_LEVEL)# set motor to the chosen power leveldefturn_motor_off(pwm):pwm.duty_u16(0)# stop the motordefforward():turn_motor_on(right_forward)turn_motor_on(left_forward)turn_motor_off(right_reverse)turn_motor_off(left_reverse)defreverse():turn_motor_on(right_reverse)turn_motor_on(left_reverse)turn_motor_off(right_forward)turn_motor_off(left_forward)defturn_right():turn_motor_on(right_forward)turn_motor_on(left_reverse)turn_motor_off(right_reverse)turn_motor_off(left_forward)defturn_left():turn_motor_on(right_reverse)turn_motor_on(left_forward)turn_motor_off(right_forward)turn_motor_off(left_reverse)defstop():turn_motor_off(right_forward)turn_motor_off(right_reverse)turn_motor_off(left_forward)turn_motor_off(left_reverse)foriinrange(numpix):strip.set_pixel(i,violet)# turn all LEDs violet when stoppedstrip.show()# --- Sensor function ---defread_sensor_avg():"""Read the distance sensor 10 times and return the average."""total=0foriinrange(10):total=total+tof.read()sleep(0.01)returnint(total/10)# --- LED animation function ---defcolor_wipe_4(offset,direction):"""Animate a moving rainbow column pattern on the LED matrix."""foriinrange(12):ifdirection==1:this_color=colors[(i-offset)%7]# forward rainbow shiftelse:this_color=colors[(i+offset)%7]# backward rainbow shiftstrip.set_pixel(i,this_color)strip.set_pixel(23-i,this_color)strip.set_pixel(i+24,this_color)strip.set_pixel(47-i,this_color)strip.set_pixel(48+i,this_color)strip.set_pixel(71-i,this_color)strip.show()# --- Main loop ---counter=0# tracks the animation frame for the rainbowwhileTrue:dist=read_sensor_avg()# read the average distanceifdist<TURN_THRESHOLD:# obstacle detectedprint('object detected')reverse()# start backing up# animate the rainbow backward while reversingfor_inrange(5):color_wipe_4(counter%7,-1)sleep(0.1)counter+=1# turn right while continuing the reversed rainbowturn_right()for_inrange(3):color_wipe_4(counter%7,-1)sleep(0.1)counter+=1else:# path is clearforward()color_wipe_4(counter%7,1)# rainbow moves forward while driving forwardcounter+=1# advance the animation frame
Your robot now lights up with a moving rainbow! You combined motor control, distance sensing, and LED animation all in one program. That is a big achievement — great job!
 This lab adds a strip of colorful LEDs to your robot. You will program the lights to change color based on what the robot is doing. Let's make your robot shine!
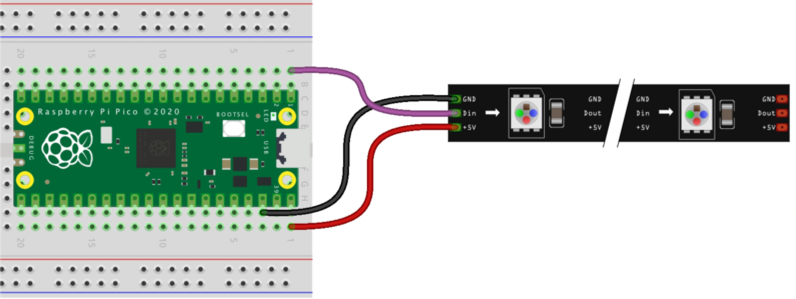
 These LED strips are called NeoPixels (a name from Adafruit) or WS2812B LEDs (the manufacturer's name). They are addressable, which means you can set the color of each LED separately using just one data wire.
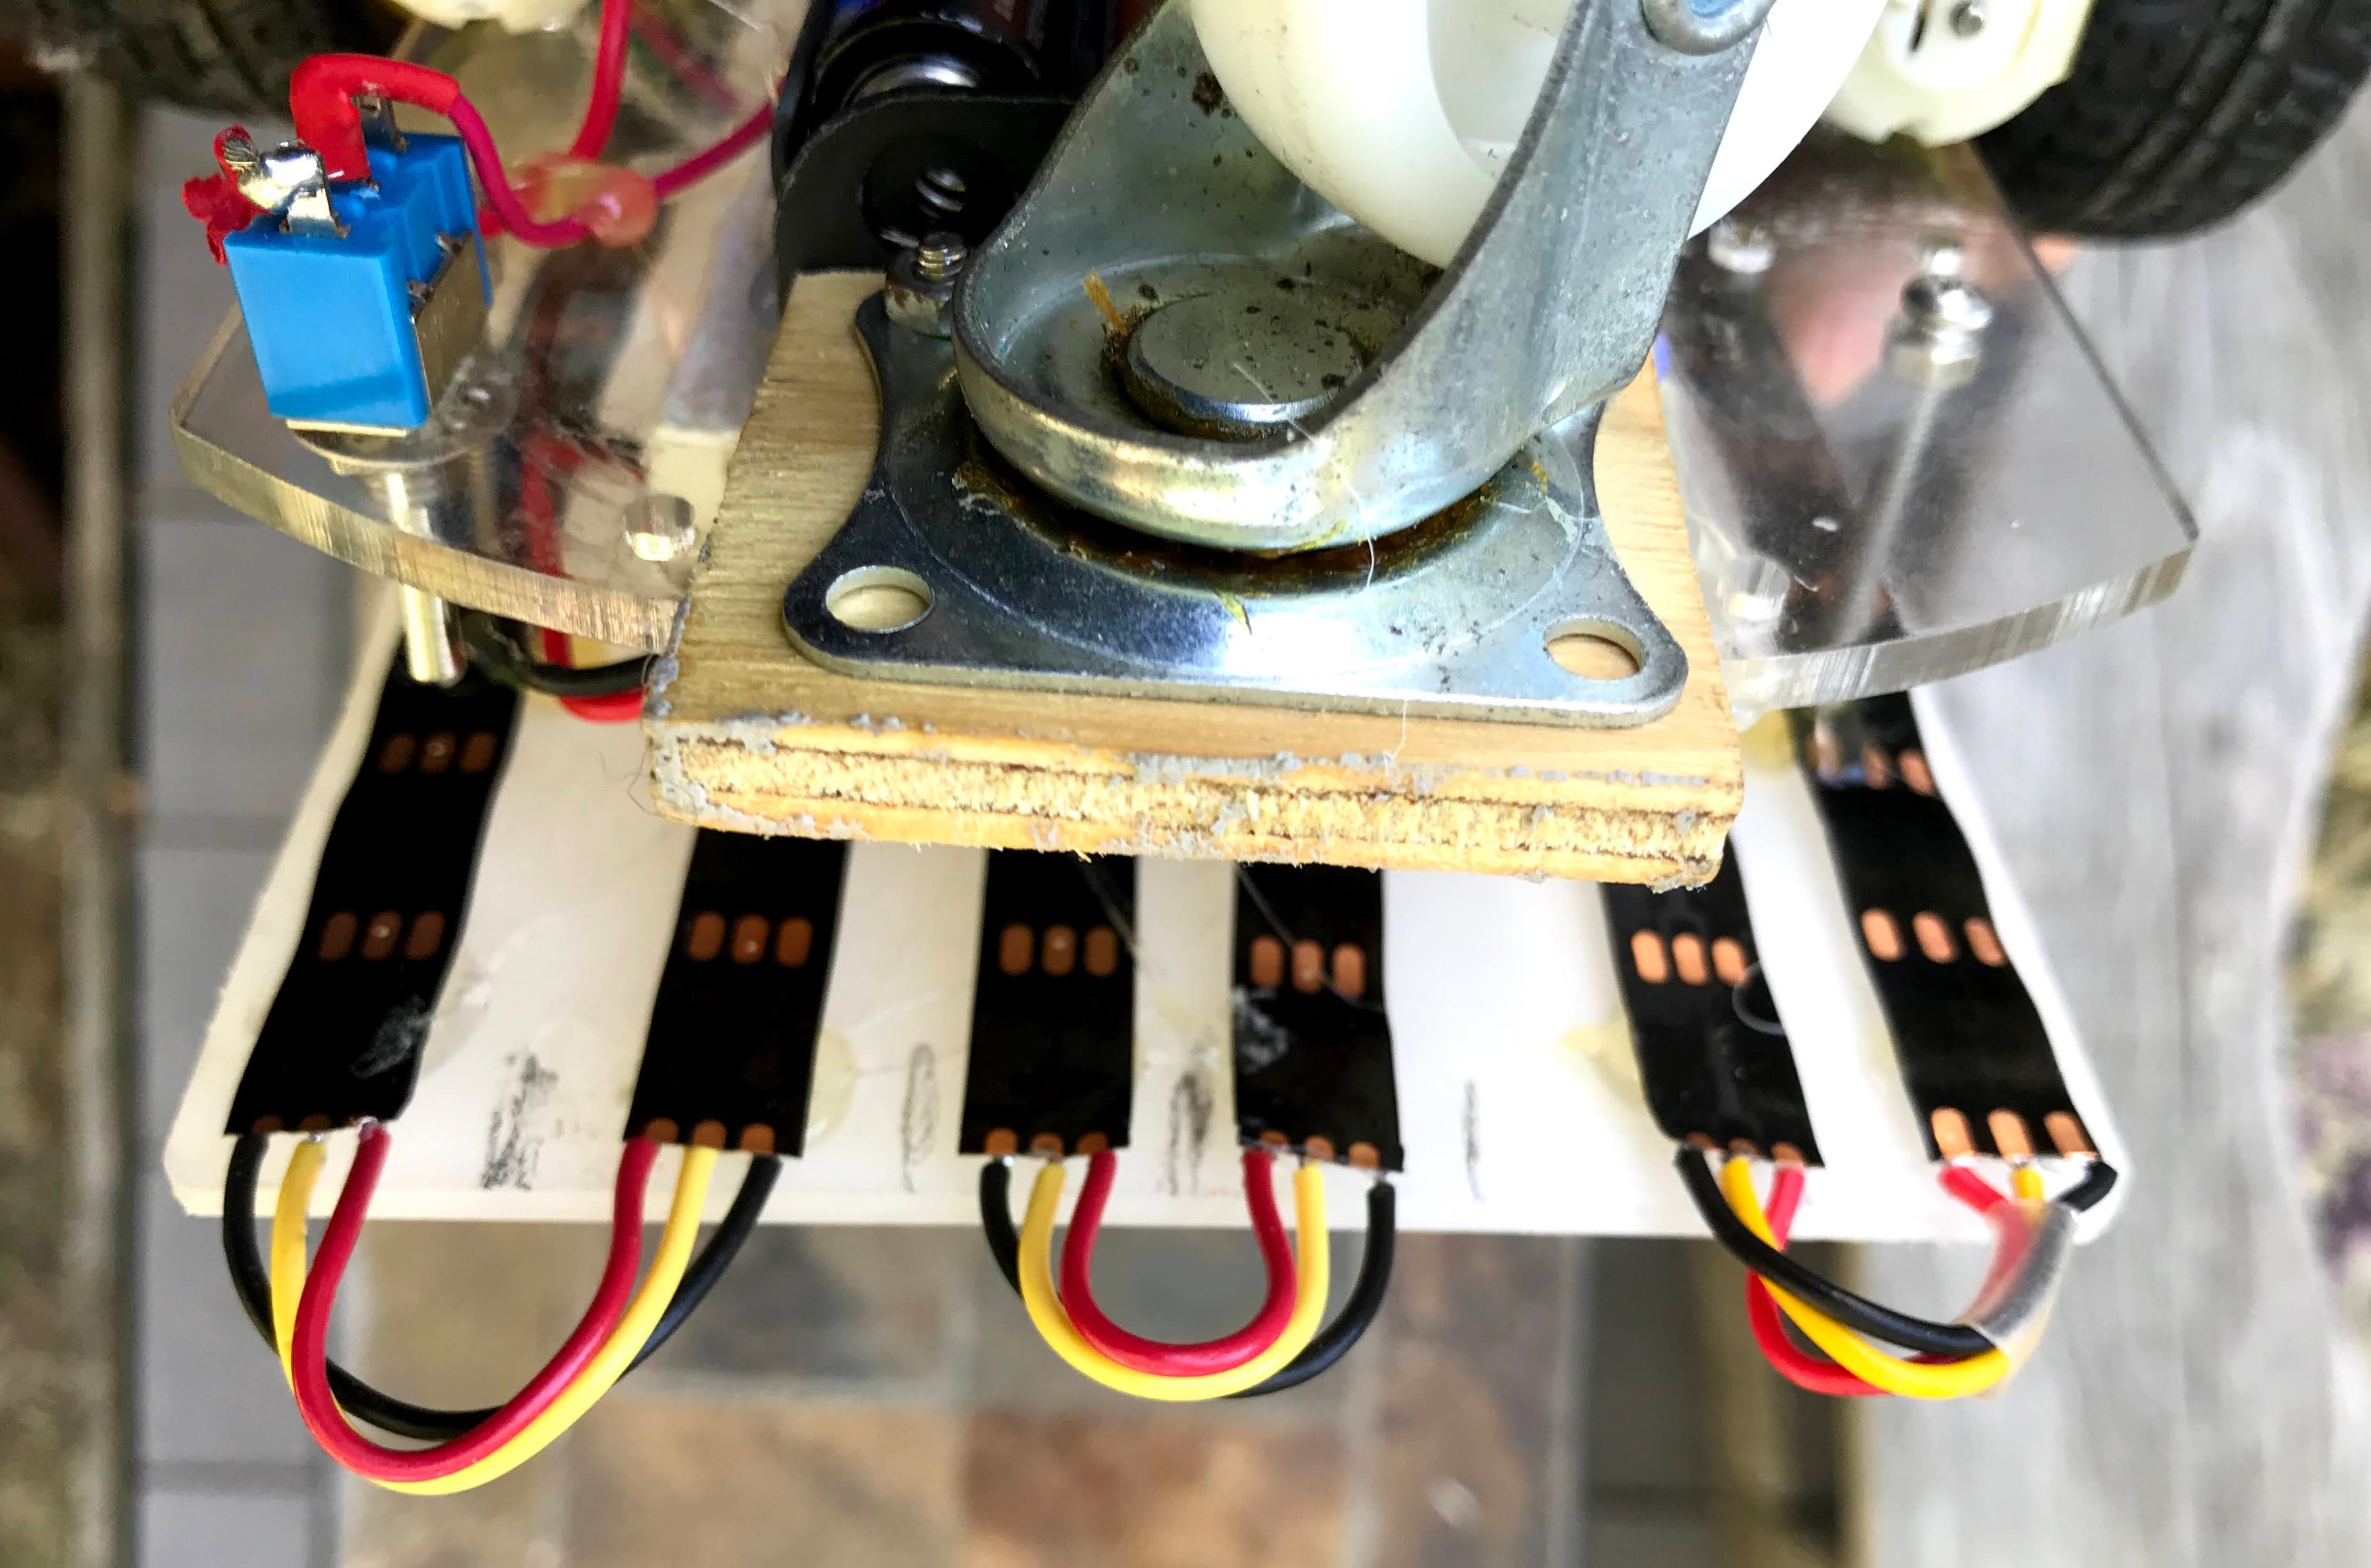

 Start with
  Your robot now lights up with a moving rainbow! You combined motor control, distance sensing, and LED animation all in one program. That is a big achievement — great job!