Moving Rainbow GitHub Summary
We like to keep things simple, or at least as simple as possible. To allow our participants to get our source code and then make changes that are added, there are only six git commands that we need:
- clone - used to pull down the repo to your local computer
- pull - used to get updates from the GitHub repository
- add - add individual files to a local update package
- commit - wrap adds into a transaction package with a comment
- push - push your package up to the server
- status - get status on your local repository status
Installing Git
Before you begin, you will need to make sure that the git command line tools are working on your computer. You can find detailed installation instructions at the Git Book Chapter on Getting Started Installing Git.
Note
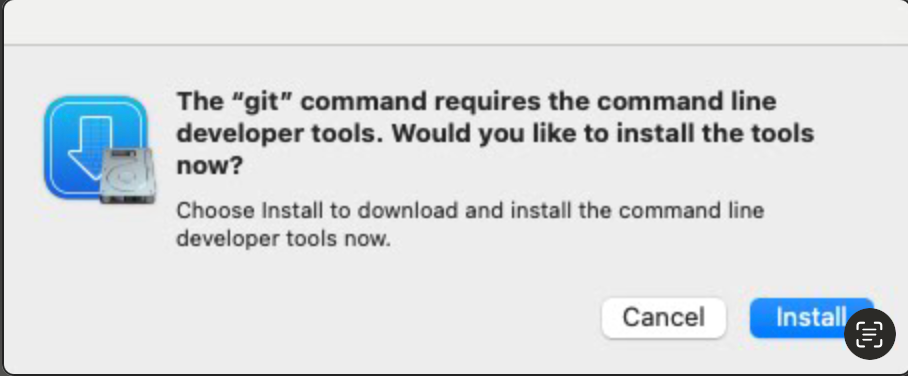
On a Mac you will get the following message the first time you try to run git for the first time. This is normal.
Git Clone
This command copies the latest version of our GitHub repository to your local file system. Let's pull all our GitHub repositories together in a folder called "projects" off of our home directory. This is called the tilde or "~" directory.
Here is a sample shell script you can run
# create a projects area to checkout your code
mkdir ~/projects
cd projects
# make a copy of the repo on your local hard drive
git clone https://github.com/dmccreary/moving-rainbow
cd moving-rainbow
# open the files in your file manager
open .
Git Pull
If you have been away from the project for a while, you will want to refresh your local code. You can also do this if a co-worker has just made a change you wnat to include.
cd ~/projects/moving-rainbow
git pull
Git Add
After you have made local changes to the Moving Rainbow source code or documentation, you might want to set up a "change set" and share it with others. You can create your own directory under the moving-rainbow/src area and add your new programs there. Once you have done that you can run the following example:
cd ~/projects/moving-rainbow
mkdir src/mycode
# copy your new code to the src/mycode directory
git add src/mycode/*
You can keep doing this until your code is all tested. Now you are read to commit the changes as a transaction.
Git Commit
In the last git add command we were just adding code without any comments. Now we want to wrap all these changes up in a package and tell others why we are adding the code or making changes. Here is that command:
git commit -m "Adding my new sample patters"
This command creates a package with a commit message. Your message should indicate why you are making the change. Git has great tools to tell you what lines changed, but it does not know why a change was made. This is your job.
Note that these changes are all collected locally. The GitHub server has not yet been changed.
Git Push
The final step is to push your package up to the central GitHub server. This is done with a simple command:
git push
This should generate a dialog such as the following:
Enumerating objects: 7, done.
Counting objects: 100% (7/7), done.
Delta compression using up to 8 threads
Compressing objects: 100% (3/3), done.
Writing objects: 100% (4/4), 404 bytes | 404.00 KiB/s, done.
Total 4 (delta 2), reused 0 (delta 0), pack-reused 0
remote: Resolving deltas: 100% (2/2), completed with 2 local objects.
To https://github.com/dmccreary/moving-rainbow.git
   efad633..68fdeae  master -> master
If you have hundreds of large files or documentation with large images this step can take a few minutes. It depends on how busy the servers are, what your ISP upload speed is and other factors such as network congestion.
Checking Your Status
After you are done, you can check your git status:
git status
This will return a text message such as:
On branch master
Your branch is up to date with 'origin/master'.