Testing a Button
A momentary push button is a switch that is only on while you hold it down. Let go, and it springs back off by itself. In this lesson you wire up your first button and read it in code.
Pixel says...
Buttons are how your project finally gets to hear from you. Every lesson before this one just ran on its own. Let's light this up — and give it ears!
What you'll learn
- What a momentary push button is and how it is different from a light switch
- How to wire a button using the Pico's built-in pull-up resistor
- How to read a button's value in code
- Why a pressed button reads as
0, not1
What you'll need
- A Raspberry Pi Pico on a breadboard
- One momentary push button
- Two jumper wires
- The kit's
config.pyfile
Wiring the Button
Your button has four legs, not two. The four legs are really two pairs, and each pair is already joined together inside the button's case. If you wire across a joined pair, the button acts like it is pressed all the time, even when you're not touching it.
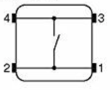
Wire across the button — corner to opposite corner — and you'll always be
using one leg from each pair. Connect one corner to pin config.BUTTON_PIN_1
(GPIO 15) and the opposite corner to GND (ground).
No resistor is needed. The Pico has a tiny resistor built into every GPIO
pin. Your code turns it on with Pin.PULL_UP.
Reading the Button in Code
This program reads the button 10 times a second and prints what it sees.
# Print the raw value of a button every tenth of a second.
from machine import Pin
from utime import sleep
import config

button = Pin(config.BUTTON_PIN_1, Pin.IN, Pin.PULL_UP)

while True:
    print(button.value())
    sleep(0.1)   # wait a tenth of a second
Run it in Thonny and watch the Shell. You should see a stream of 1s. Now
hold the button down — the stream switches to 0. Let go, and it's back
to 1.
Pixel thinks...
That might feel backwards at first. With PULL_UP, the pin normally
sits at 3.3 volts, which reads as 1. Pressing the button connects the
pin straight to ground, which reads as 0. So remember: pressed
means zero.
Try It Yourself
- Change
sleep(0.1)tosleep(1). Is it harder or easier to catch a quick press? - Instead of printing
0or1, print the word"pressed"or"released"using anifstatement.
Check Your Understanding
- What happens to the circuit inside a momentary button when you let go of it?
- Why do the four legs matter? What happens if you wire across a joined pair by mistake?
- With
Pin.PULL_UP, what value does the pin read when the button is not pressed? - What part inside the Pico means you don't need an extra resistor?
You've got this!
Your project can now sense the outside world. Every interactive kit you build from here on starts with this exact same idea.
What's next: in Button + Built-in LED, you'll use this same button to turn the Pico's onboard LED on and off.