Moving Rainbow Base Kit User's Guide

Pixel says...
 Hi, I'm Pixel! This is the kit I live in. Thirty little lights, two buttons,
and one tiny computer. Every lesson in this book runs on it. Let's light
this up!
Hi, I'm Pixel! This is the kit I live in. Thirty little lights, two buttons,
and one tiny computer. Every lesson in this book runs on it. Let's light
this up!
The base kit is the standard Moving Rainbow setup. It is a Raspberry Pi Pico (a small computer chip you can program) driving a strip of 30 addressable LEDs, plus two push buttons you can use to change patterns. The kit also contains a USB cable used to program and power your kit.
Kit Contents
- Raspberry Pi Pico Microcontroller
- 400-tie solderless breadboard
- 30-pixel addressable RGB LED strip
- 2 momentary press buttons
- USB cable
- 22-gage hookup wire
User's Guide
This page is the user's guide for the kit — how to wire it, power it, load code onto it, and fix it when it acts up.
- To buy or build a kit, see the Purchasing Guide.
- To learn the ideas behind the code, see the Chapters.
- To write your first programs, see the Hands on Labs.
What You Can Build With It
Everything below runs on this one kit, with no extra parts:
- A pixel that blinks, then fades, then moves along the strip
- A full rainbow that slides down the strip and wraps around
- A comet with a glowing tail, a candle that flickers, and a Larson scanner like the Cylon eye
- A heartbeat, a field of fading stars, and a bouncing ball that settles to rest
- A breathing wave of light and a sunrise that blends colors from night to day
- A clock that shows the time as colored pixels
- A mode machine — one program with a dozen light shows, and buttons that switch between them
Check Your Kit
Lay your parts out and check them off. Every kit should have these:
| Part | How many | What it does |
|---|---|---|
| Raspberry Pi Pico | 1 | The computer chip that runs your code |
| 400-point breadboard | 1 | Connects parts together with no soldering |
| 30-pixel WS2812B LED strip | 1 | The lights, with three wires already soldered on |
| Momentary push button | 2 | Buttons that count only while you hold them down |
| Jumper wires | ~5 | Short wires that connect the parts |
| Micro USB data cable | 1 | Carries both your code and the power |
Some kits also include a 3-screw terminal header, so you can swap strips without soldering. It is nice to have, and nothing on this page needs it.
Check your USB cable
Make sure your cable is a data cable, not a charge-only cable. A charge-only cable lights up the board but hides it from your computer. It looks exactly like a dead board, and it fools almost everyone once.
How the Parts Connect
There are only five connections in the whole kit: three for the strip and one for each button.
Where the Pico Sits
Put the Pico on the breadboard with the USB connector at the top. Push it down until it sits flat. The pin in the top-left corner is now GP0, and that is where the strip's data wire goes.
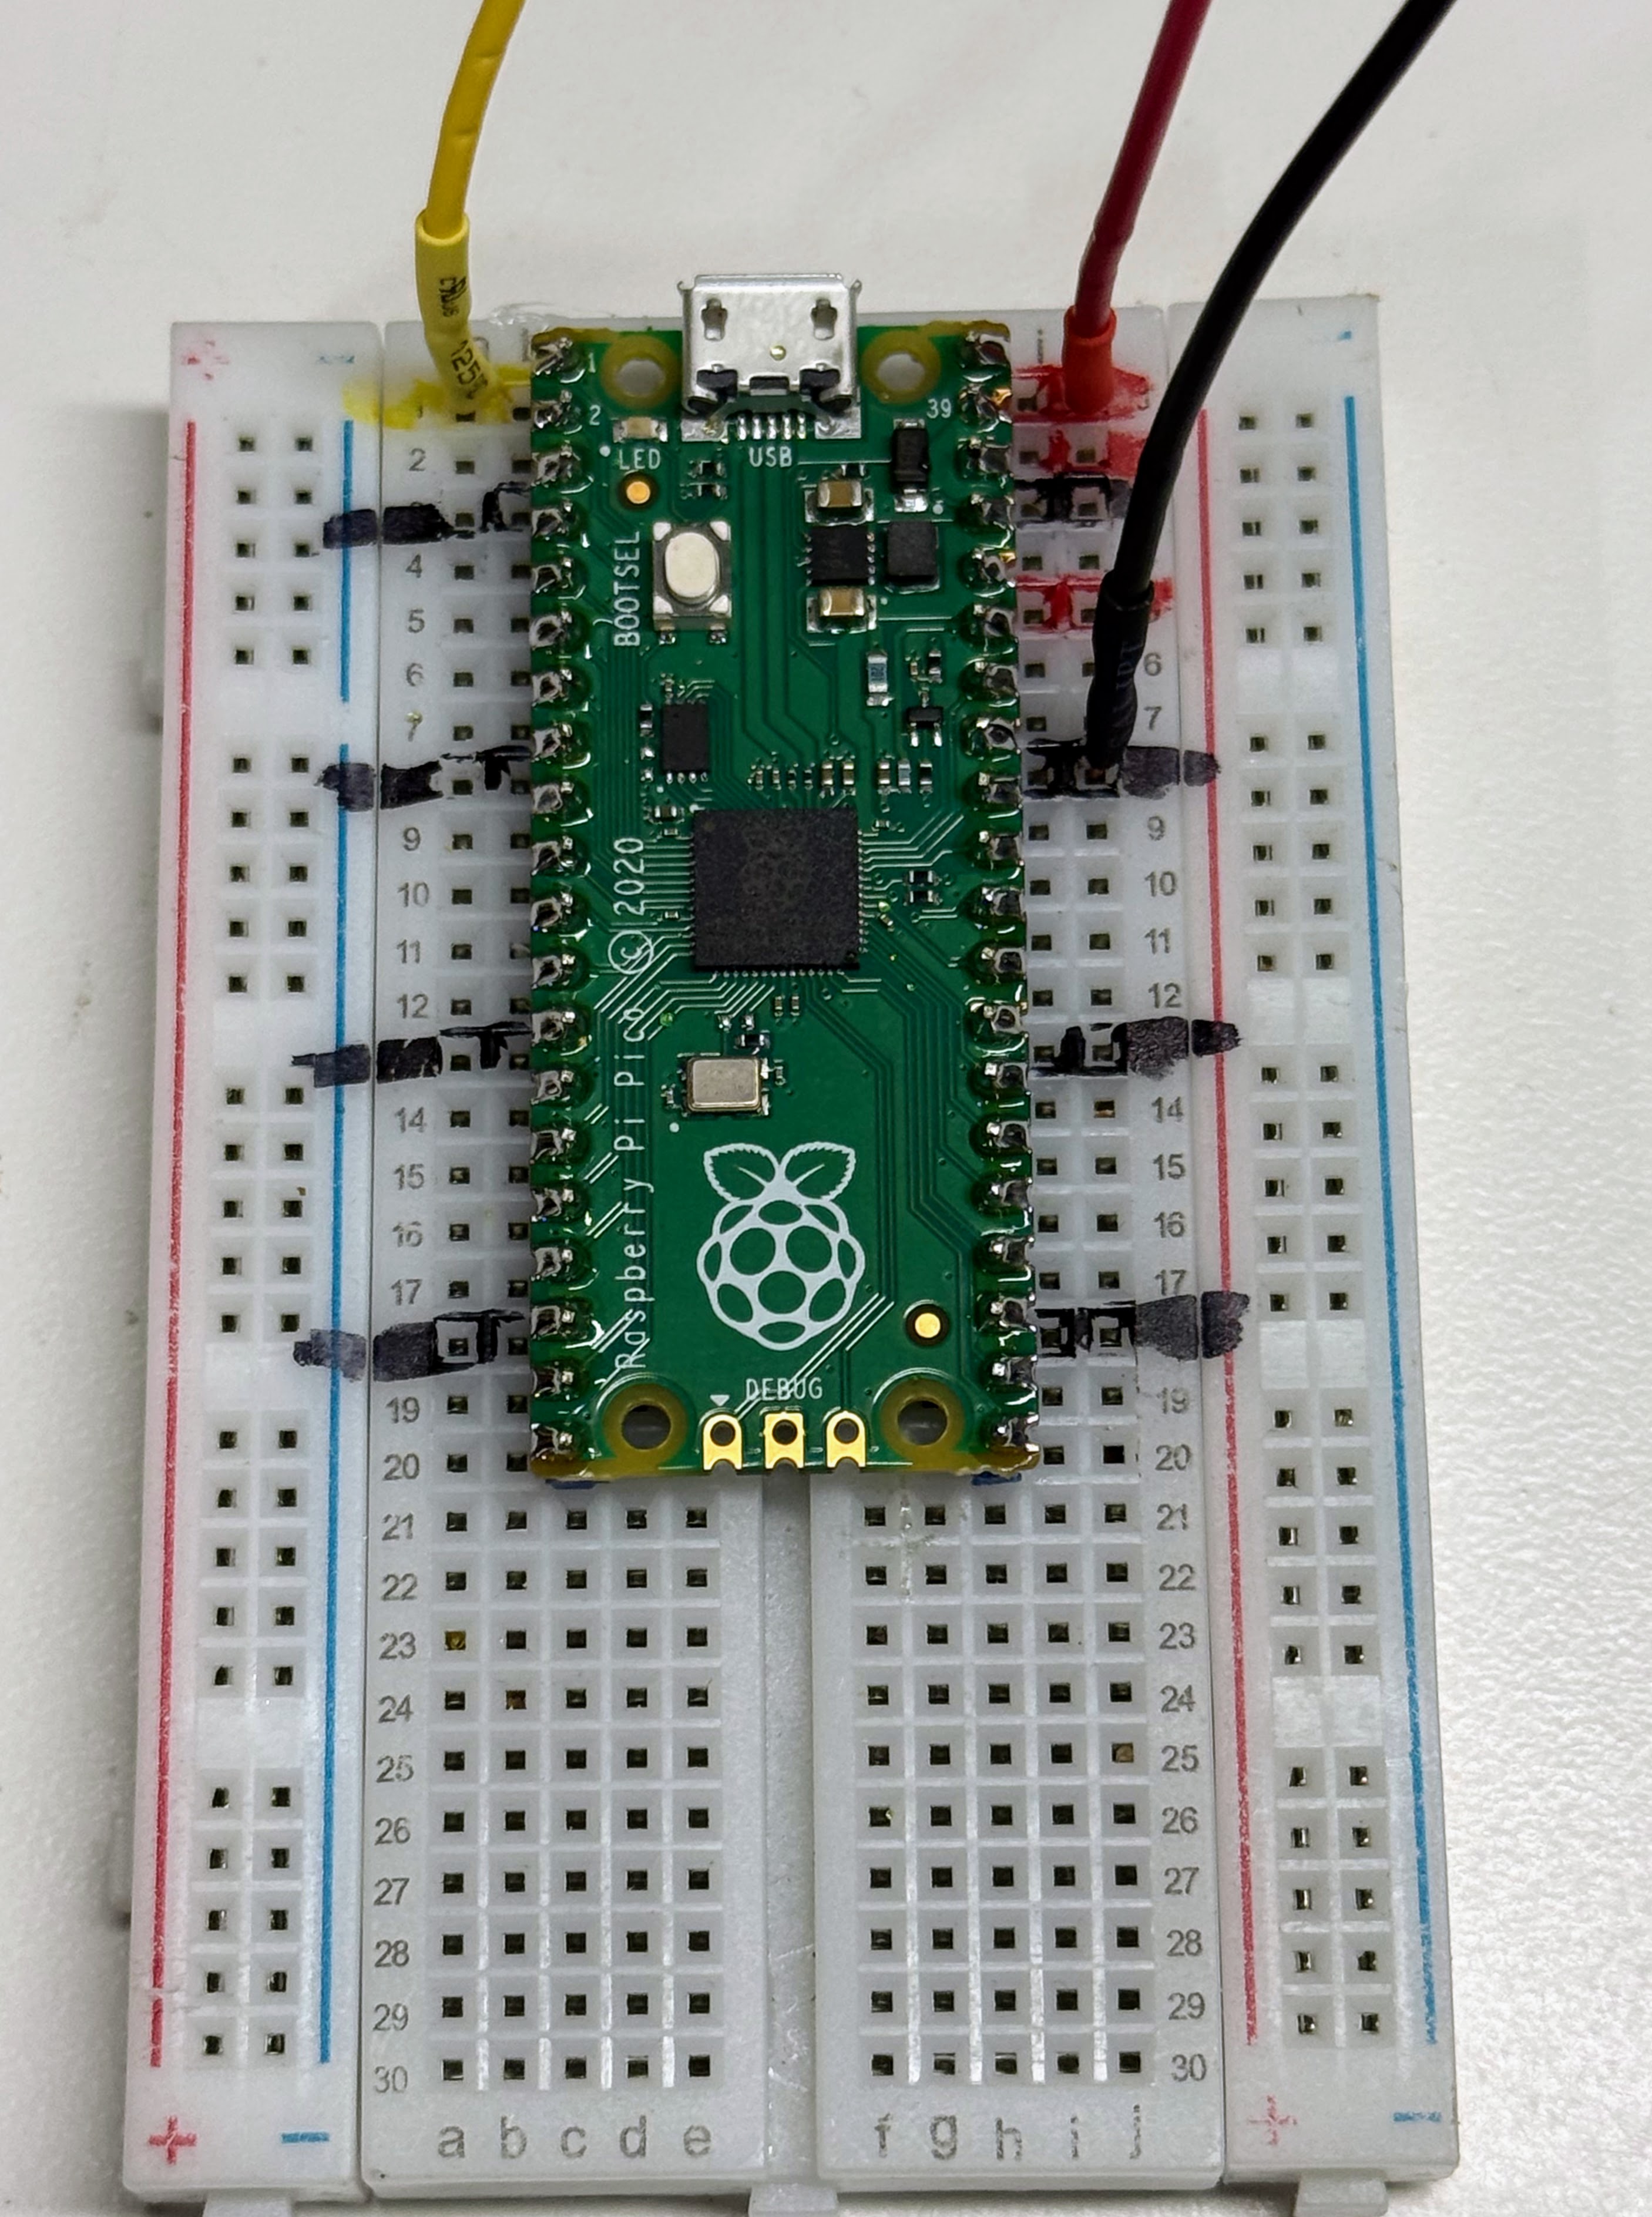
Many teachers mark the rails with a permanent marker before handing kits out — black for ground, red for power, yellow for data. If your board has marks like the ones above, follow them.
The Three Wires to the LED Strip
An addressable LED strip is a chain of pixels that each read their own color off a single wire. That is why 30 lights need only one data pin.
| Strip wire | Goes to | Pico pin |
|---|---|---|
| Black — ground | Any GND pin |
Pin 38 works well |
| Red — power | VBUS (the 5 volts from USB) |
Pin 40 |
| Yellow or green — data | GP0 |
Pin 1 |
Connect them in this order: ground first, then power, then data. Ground is the shared return path for the whole circuit. Hooking up data before ground can push current through the first pixel the wrong way.
Watch out!
 The strip has a direction. Data goes in one end and flows out the
other. Look for the tiny arrows printed between the pixels — they point
away from the input end. Wire your data line to the end the arrows point
away from. A backwards strip stays completely dark, and the wiring looks
perfect the whole time.
The strip has a direction. Data goes in one end and flows out the
other. Look for the tiny arrows printed between the pixels — they point
away from the input end. Wire your data line to the end the arrows point
away from. A backwards strip stays completely dark, and the wiring looks
perfect the whole time.
Want to practice before you wire? Try the NeoPixel Wiring Diagram simulation first.
The Two Buttons
Push the buttons into the breadboard so their legs straddle the center channel — the groove down the middle. They are built to fit that way.
Each button needs just two connections:
| Button | One side goes to | The other side goes to |
|---|---|---|
| Button 1 | GP15 (pin 20) |
The ground rail |
| Button 2 | GP14 (pin 19) |
The ground rail |
No resistors are needed. The Pico has internal pull-up resistors — tiny resistors inside the chip that hold the pin at 3.3 volts until something pulls it down. Your code turns one on like this:
from machine import Pin

# PULL_UP holds the pin HIGH until the button connects it to ground
button = Pin(15, Pin.IN, Pin.PULL_UP)
So the pin reads 1 when the button is up, and 0 when you press it. That feels backwards at first, and it is worth saying out loud once: pressed means zero.
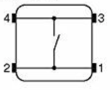
These buttons have four legs, not two. The four legs are really two pairs, and each pair is already joined together inside the button. If you wire across a joined pair, the button acts like it is pressed forever. Wire across the button — corner to opposite corner — and you will always be on the right pair.
The Pin Map
Every program in the kit reads its pin numbers from one shared file called
config.py:
# config.py — the hardware settings for your kit
NEOPIXEL_PIN = 0      # data pin for the LED strip
NUMBER_PIXELS = 30    # how many pixels are on your strip
BUTTON_PIN_1 = 15     # first button
BUTTON_PIN_2 = 14     # second button
Because every program starts with import config, you never have to remember
pin numbers. You write config.NEOPIXEL_PIN and the right number fills in.
This is the one file you may need to edit. If your strip has 60 pixels
instead of 30, change NUMBER_PIXELS to 60 and every program follows along.
That is the DRY principle — Don't Repeat Yourself — doing real work for you.
Your First Power-Up
Do these five steps in order. They take about fifteen minutes the first time and about thirty seconds every time after.
1. Install Thonny. Thonny is the free program you write code in. The Desktop Setup page walks through the install for Windows, Mac, and Linux.
2. Put MicroPython on the Pico. A brand-new Pico has no Python on it yet. Thonny can install it for you in about a minute. The Desktop Setup page covers this too, including what to do if the automatic download stalls.
3. Plug in the USB cable. The green light on the Pico comes on. In the bottom-right corner of Thonny you should see MicroPython (Raspberry Pi Pico).
4. Say hello in the Shell. Click in the Thonny Shell panel at the bottom and type these lines one at a time:
from machine import Pin
from neopixel import NeoPixel
strip = NeoPixel(Pin(0), 30)
strip[0] = (32, 0, 0)
strip.write()
The first pixel turns dim red. That one line — strip.write() — is what
actually sends the colors down the wire. Nothing changes on the strip until
you call it.
5. Turn it off again.
strip[0] = (0, 0, 0)
strip.write()
If both of those worked, your wiring is correct and your kit is ready. If the pixel stayed dark, jump to When Something Doesn't Work below.
Pixel's tip
 Start every pixel dim — try
 (32, 0, 0) instead of (255, 0, 0). Your
eyes will thank you, your batteries will last longer, and you can still
see every color perfectly. Full brightness is for showing off later!
Getting Code onto the Kit
Your code lives on your computer. The Pico has its own small filesystem, and you copy files over to it.
Copy config.py first
Every other program needs it. In Thonny, open config.py, then choose
File → Save as… → Raspberry Pi Pico and keep the name config.py.
Then copy the programs you want
Same steps for any program file. Save it to the Pico, press the green Run arrow, and watch the strip.
The fast way, for a whole class
If you are setting up many kits, copying files one at a time gets old. The kit
folder includes a script that copies everything at once using a tool called
mpremote.
Install the tool once:
pip install mpremote
Then plug in a Pico and run:
./src/kits/moving-rainbow-base/upload-code.sh
The script finds the board, copies every .py file in that folder, and lists
what landed on the Pico. Twenty kits take about a minute each.
All of the kit's source code lives in
src/kits/moving-rainbow-base/
if you would rather browse it on GitHub.
The Programs on Your Kit
The files are numbered so you can work through them in order. Each one adds a single new idea. Here are the ones worth running first:
| File | What you'll see | Lab |
|---|---|---|
02-blink.py |
One red pixel blinks on and off | Lab 02: Blink |
03-red-green-blue.py |
One pixel steps through red, green, and blue | Lab 03: Red, Green and Blue |
04-dimmer.py |
One pixel fades up and down | Lab 04: Dimmer |
05-move.py |
A single dot slides along the strip | Lab 05: Move a Pixel |
07-color-wipe.py |
Color fills the strip one pixel at a time | Lab 07: Color Wipe |
08-random.py |
Pixels light in random colors | Lab 08: Random |
09-color-wheel.py |
Every color of the rainbow, from one function | Lab 09: Color Wheel |
11-rainbow.py |
A still rainbow across all 30 pixels | Lab 11: Rainbow |
13-moving-rainbow.py |
The rainbow slides — the program the project is named for | Lab 13: Moving Rainbow with the Color Wheel |
15-moving-band.py |
Bands of color travel down the strip | Lab 15: Moving Band |
16-comet.py |
A bright head with a fading tail | Lab 16: Comet |
18-candle-flicker.py |
A warm, random candle flame | Lab 18: Candle Flicker |
19-theater-chase.py |
Classic chasing marquee lights | Lab 19: Theater Chase |
20-ripple.py |
Drops falling in a one-pixel-wide pond | Lab 20: Ripple |
21-twinkle-colors.py |
Random pixels sparkle for a moment | Lab 21: Twinkle Colors |
23-heartbeat.py |
One pixel beats like a heart | Lab 23: Heartbeat |
24-fading-stars.py |
Stars flare up and fade away smoothly | Lab 24: Fading Stars |
25-bouncing-ball.py |
A ball drops and bounces lower each time | Lab 25: Bouncing Ball |
26-breathing-wave.py |
A wave of blue light breathes along the strip | Lab 26: Breathing Wave |
27-sunrise.py |
Colors blend from night to dawn to day | Lab 27: Sunrise |
28-clock.py |
The time, shown in binary with colored pixels | Lab 28: Binary Clock |
29-larson-scanner.py |
The Cylon eye sweeping back and forth | Lab 29: Larson Scanner |
And these bring the buttons in:
| File | What you'll see | Lab |
|---|---|---|
32-button-test.py |
Prints 1 and 0 in the Shell as you press — the fastest way to prove a button is wired right |
Lab 32: Button Test |
33-button-led-test.py |
The Pico's own tiny green LED follows the button | Lab 33: Button and Built-in LED |
34-two-button-print.py |
A counter that goes up with one button and down with the other | Lab 34: Two Buttons |
47-buttons-move-light.py |
Buttons push a lit pixel up and down the strip | Lab 47: Buttons Move a Light |
31-modes.py |
A state machine — twelve patterns in one program, buttons step through them | Lab 31: Button Modes |
48-pixel-demo.py |
The full demo program we run at science fairs | Lab 48: Pixel Demo |
Every numbered program has its own lab page. The Hands on Labs list shows all of them in order, including the ones not listed here.
A Path Through the Kit
You do not have to follow this exactly. It is the order that has worked best in classrooms.
First hour. Run 02-blink.py. Change the color. Change the sleep time.
Change strip[0] to strip[5]. Four small edits, four instant results — that
loop of change something, see something is the whole method.
First week. Work through the single-pattern programs, roughly 01 to
16. Along the way you will meet for loops, lists, functions, and the RGB
color model. Chapter 9
explains what the NeoPixel library is doing underneath.
Second week. Add the buttons. Start with 32-button-test.py, then
34-two-button-print.py, then 47-buttons-move-light.py.
Chapter 18 covers
debouncing — the trick that keeps one press from counting as three.
After that. Open 31-modes.py and read it as a map. It ties every pattern
you wrote into one program with a mode variable. The
State Machine simulation shows the
same idea as a picture.
Then make it yours. Add your own pattern to the mode list. That single change is the most common capstone project in the course, and it is a real one.
Running Without a Computer
Once a program works, you can make the kit run it on its own.
Save your program to the Pico with the name main.py. MicroPython looks
for that exact name every time the board powers on, and runs it. Unplug from
the computer, plug into a USB phone charger or a USB battery pack, and your
light show starts by itself.
This is how the kit becomes a costume, a sign, or a shelf decoration. See Batteries for what to power it with.
To get back to editing, plug into your computer and press Stop in Thonny before the program grabs the board. If it will not let go, the Troubleshooting Resets page has the rescue steps.
How Bright Can You Go?
Each pixel has a red, a green, and a blue LED inside. Each one draws about 20 milliamps at full power, so a single pixel showing full white draws about 60 milliamps.
Now multiply. All 30 pixels at full white is about 1,800 milliamps — and a normal USB port supplies only about 500. That is more than three times what the port can give.
Here is the safe rule for this kit:
Keep your color values at 64 or below when you light up the whole strip.
At 64, all 30 pixels together draw roughly 450 milliamps, which a USB port handles comfortably. Patterns that light only a few pixels at a time — comets, scanners, twinkle — can go brighter, because most of the strip is dark.
Why Some Programs Use Small Numbers
The "64 or below" rule is a shortcut. What really counts is the total current for every lit pixel. Add it up in three steps:
- Add one pixel's red, green, and blue numbers together.
- Divide by 255, then multiply by 20. That is the pixel's milliamps.
- Multiply by the number of pixels lit at the same time.
Try it on the day color from Lab 27, which is (80, 60, 20). The numbers add
up to 160. That is about 12.5 milliamps for one pixel, and about 377 for all 30.
The red number is 80, which is more than 64, but the total is still under 500.
Color matters too. A solid red strip at 200 draws about 471 milliamps, because only one of the three LEDs is on. A solid white strip at 200 would draw about 1,412, because all three are on.
Two programs keep their numbers small on purpose:
| Program | How it stays under the limit | Most the whole strip can draw |
|---|---|---|
| Lab 26: Breathing Wave | MAX_BRIGHTNESS = 60, and only the green and blue LEDs light |
About 212 mA if every pixel peaked at once. The wave keeps it lower, because the pixels peak at different times. |
| Lab 27: Sunrise | Every sky color uses small numbers | About 377 mA, at its brightest color, day |
When you write your own pattern that lights the whole strip, add up the total first. Aim for 450 milliamps or less. Some lab pages have a Power check box. It shows the estimate for that program and a smaller number to try. If the far end of your strip flickers or turns white, the strip needs more current. See When Something Doesn't Work.
Try the LED Current Predictor to see the numbers change as you adjust brightness, and the Battery Life Calculator to plan a costume. Chapter 17 covers power in depth.
When Something Doesn't Work
Every one of these has happened in a real classroom. Work down the list — the top rows are the most common by far.
| What you see | What's likely going on | What to try |
|---|---|---|
| Thonny doesn't see the Pico | Charge-only USB cable | Swap in a cable marked "data" or "sync". Keep one known-good cable for testing |
| Thonny still doesn't see it, on a Mac | A known macOS USB bug | See macOS USB Bugs |
| No lights at all | Strip is wired backwards | Find the arrows between pixels; data goes in the end they point away from |
| No lights, wiring looks right | Missing strip.write() |
Colors only appear after strip.write() runs |
| No lights, and no green light on the Pico | No power reaching the board | Reseat the USB cable and press the Pico flat into the breadboard |
| Only the first pixel lights | Data reaches pixel 1 and stops | Check the solder joint on the data pad, and check NUMBER_PIXELS in config.py |
| Red and green are swapped | Your strip uses a different color order | Swap the first two numbers in your color tuples: (0, 255, 0) instead of (255, 0, 0) |
| Far end flickers or goes white | Not enough current | Lower your brightness values, or power the strip from its own USB supply |
| A button does nothing | Wired across a joined pair of legs | Move the wire to the opposite corner of the button |
| A button acts permanently pressed | Same joined-pair problem, other way around | Same fix — wire corner to opposite corner |
| Buttons work in some programs only | PULL_DOWN vs PULL_UP mismatch |
Change PULL_DOWN to PULL_UP in that file |
| One press counts as several | Contact bounce | Add a debounce delay — see Chapter 18 |
| The board won't stop or reset | A main.py program has the board busy |
See Troubleshooting Resets |
Test before you change anything
Run 32-button-test.py or the five-line Shell test from Power-Up first.
They tell you in ten seconds whether the problem is in your wiring or in
your code, which cuts the list above in half.
Taking the Kit Further
The base kit is the starting point for most of the other projects in this book. When you are ready, these all build on the same Pico, the same strip, and the same code you already know:
- Holiday Hats — wear your strip for five different holidays
- Cylon Pumpkin — a scanner eye in a jack-o'-lantern
- Digital Nightlight — add a light sensor so it turns itself on
- Jake's Fire — a flickering flame effect
- Bookstore Sign — light up letters and shapes
- 8x8 NeoPixel Matrix — move from a line of pixels to a grid
You've got this!
 Look at you — wired, powered, and glowing. Everything from here is just
changing numbers and seeing what happens. That is what programmers
actually do all day, and now you can do it too.
Look at you — wired, powered, and glowing. Everything from here is just
changing numbers and seeing what happens. That is what programmers
actually do all day, and now you can do it too.
What's Next
Start with Lab 01: Blink the Onboard LED. It needs no wiring and proves your Pico and Thonny are working. Then move on to Lab 02: Blink. It uses one pixel and a few lines of code, and it is the beginning of every light show in this book.