Lab 6: Walk the Pixels
Pixel says...
 I'm going for a walk, and I'm visiting every pixel on the matrix! Watch my path. It will tell us how
the pixels are numbered. Let's light this up!
I'm going for a walk, and I'm visiting every pixel on the matrix! Watch my path. It will tell us how
the pixels are numbered. Let's light this up!
Program file: 06-walk-pixels.py
What you'll learn
- How the 256 pixels are numbered from 0 to 255
- How
strip[i]with a loop variable picks each pixel in turn - How to erase a pixel in memory
- What a zig-zag (serpentine) panel is, and how to tell if yours is one
What you'll need
- Your kit, with the matrix wired as shown in the Kit Guide
config.pysaved on the Pico- Thonny open and connected to your Pico
- A quick look at Lab 05: Move a Pixel in the base labs. It uses the same idea
The program
This program lights one pixel at a time, in purple, starting at pixel 0 and ending at pixel 255.
# Test 06: Walk the Pixels
# Filename: 06-walk-pixels.py
# Version: 1.0.0
#
# Lights one pixel at a time in strip order, from pixel 0 to pixel 255.
# Watch the path. A zig-zag path means the panel is serpentine wired.
# Not yet tested on hardware.

from machine import Pin
from neopixel import NeoPixel
from utime import sleep
import config

print("Test 06: Walk the Pixels (version 1.0.0)")

# hardware settings from config.py
NEOPIXEL_PIN = config.NEOPIXEL_PIN
NUMBER_PIXELS = config.NUMBER_PIXELS

strip = NeoPixel(Pin(NEOPIXEL_PIN), NUMBER_PIXELS)

while True:
    for i in range(NUMBER_PIXELS):
        strip[i] = (40, 0, 40)
        strip.write()
        sleep(0.03)
        strip[i] = (0, 0, 0)    # erased by the next write()
Run it. A purple pixel starts in the upper-left corner and runs along the top row from left to right. Then it jumps to the start of the second row and runs left to right again. It takes about eight seconds to visit all 256 pixels.
Test 06: Walk the Pixels (version 1.0.0)
Here are the pixel numbers on this kit's matrix. Pixel 0 is in the upper-left corner. Each row has 16 pixels.
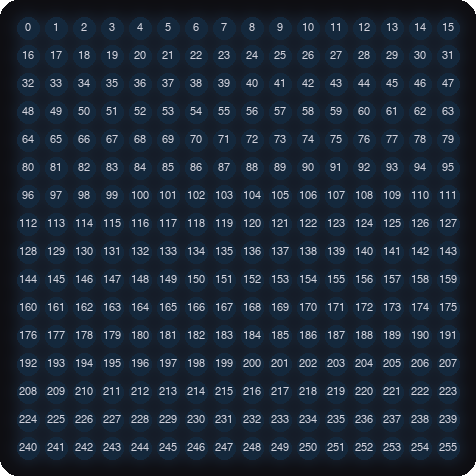
This picture was drawn by a computer simulator.
How it works
Let the loop pick the pixel
for i in range(NUMBER_PIXELS):
    strip[i] = (40, 0, 40)
The variable i is the counter from the for loop. Each time around, i gets one bigger: 0, 1, 2, and so on up to 255. So strip[i] lights a different pixel each time. The color (40, 0, 40) is red plus blue, which makes purple.
Write, wait, erase
strip.write()
sleep(0.03)
strip[i] = (0, 0, 0)    # erased by the next write()
First strip.write() shows the pixel. Then sleep(0.03) holds it for three hundredths of a second. The last line turns pixel i off in memory. The matrix does not change yet. The next trip lights pixel i + 1. Its strip.write() sends the whole picture: old pixel off, new pixel on.
One write per step is a rule of this kit. The matrix needs a short quiet moment after each write. Two writes in a row can leave it too little time.
Key idea
Row 0 holds pixels 0 to 15, row 1 holds 16 to 31, and so on. For a pixel in row y and column x, the number is y * 16 + x. You will use this in the next lab.
What is a zig-zag panel?
Some 16x16 panels are wired in a zig-zag. Row 0 runs left to right, row 1 runs right to left, and the line keeps snaking back and forth. On those panels the pixel after 15 sits at the right end of row 1.
This kit's matrix has rows that all run left to right, so SERPENTINE = False in config.py. Watch your walk. If the purple pixel zig-zags instead, change SERPENTINE to True in config.py. Save it on the Pico and run the program again.
Try it yourself
- Change the speed. Set
sleep(0.03)tosleep(0.01). Time how long a trip takes. How long should it take? - Walk only the top row. Change
range(NUMBER_PIXELS)torange(16). Then change it torange(16, 32). Which row do you see now? - Walk down the left edge. Change
range(NUMBER_PIXELS)torange(0, 256, 16). The third number inrangeis the step size. Why does this walk down a column? - Walk backwards. Use
range(255, -1, -1). Where does the walk begin now?
Check your understanding
- What is the number of the pixel in the upper-left corner? What about the lower-right corner?
- What does
istand for instrip[i]? - How many pixels are in each row? Which pixel starts row 2?
- About how long does one trip take at
sleep(0.03)? How did you work it out? - What would a zig-zag panel do differently?
Lab complete!
 You mapped all 256 pixels! Knowing the numbers is the key to drawing anywhere you like.
What's next: In Lab 7: X-Y Corners, you will write a function that finds pixel numbers.