Switches, Buttons, and Wired Logic
Summary
This chapter covers push buttons and switches, and the course's signature no-code trick: wiring two buttons in series to build an AND gate, or in parallel to build an OR gate, using nothing but wires and switches.
Concepts Covered
This chapter covers the following 20 concepts from the learning graph:
- Push Button
- Tactile Button
- 4-Pin Push Button
- Momentary Switch
- Latching Switch
- Toggle Switch
- Slide Switch
- Rocker Switch
- DIP Switch
- SPST Switch
- SPDT Switch
- Normally Open
- Normally Closed
- Contact Bounce
- Button Debouncing
- Debounce Capacitor
- Series Switch Wiring
- Switch AND Logic
- Parallel Switch Wiring
- Switch OR Logic
Prerequisites
This chapter builds on concepts from:
- 1. Electricity Basics: Voltage, Current, and Resistance
- 2. Current, Charge, Units, and Electrical Safety
- 9. Resistors and Capacitors
Chapter 15 closed with a promise: the breadboard was coming back into your hands directly, no chip required this time. That promise starts paying off right now. This chapter builds up from the simplest possible input — a single push button — through the whole family of switches you'll meet in real kits and real projects, and then lands on the course's signature trick: wiring two ordinary switches together to build a logic gate, using nothing but wire.
No chip. No code. Just the physical arrangement of a few wires deciding whether an LED lights up. By the end of this chapter you'll be able to look at any two-switch circuit and predict its behavior before you ever plug in a battery — a skill that carries straight through to the transistor logic gates waiting later in this course.
Wires That Think
 Welcome back, builder! Today starts simple — a button, a click, a light — and ends with something genuinely wild: wiring that makes decisions. Stick with me through the switch family and a sneaky little problem called contact bounce, and I promise the payoff at the end is worth it. Let's light it up!
Push Buttons: Your Simplest Input
Every circuit needs a way for a human to tell it what to do, and the humble push button is the simplest way there is. A Push Button is a component that completes or breaks an electrical connection only while a finger is actively pressing it down — the moment you let go, the connection returns to whatever state it was in before.
Most of the buttons in your $50 kit are Tactile Buttons, a style of push button that gives your fingertip a distinct little "click" as it presses, thanks to a tiny dome-shaped metal spring hidden inside the plastic case. That click isn't just for feel — it's the spring snapping from one shape to another, and that snap is exactly what makes clean, reliable contact happen fast.
Look closely at one of these buttons and you'll count four metal legs, not two. A 4-Pin Push Button is the standard tactile-button style with four legs that are really only two electrical connections in disguise. The two legs on one side of the button are permanently joined together inside the case, and the two legs on the other side are permanently joined together too — pressing the button is what connects those two sides to each other.
That's exactly why a 4-pin push button gets placed straddling a breadboard's center channel, one pair of legs on each side, so pressing the button bridges two completely separate banks of connected rows.
- The two legs on the west side are already tied together inside the case
- The two legs on the east side are already tied together inside the case, separately from the west pair
- Pressing the button joins the west side to the east side, completing the path
- Releasing the button splits them apart again instantly
Déjà Vu? You've Straddled Before
 That straddle-the-center-channel move should feel familiar — it's the exact same habit Chapter 15 taught you for seating a DIP chip. A 4-pin push button isn't a chip, but it uses the identical breadboard trick for the identical reason: keep two separate banks of pins electrically apart until the component itself decides to join them.
A push button is one specific example of a Momentary Switch — any switch that only stays in its "on" position while you're actively holding it there, then springs straight back the instant you release it. Nearly every button in your kit behaves this way, because momentary behavior is exactly what makes a doorbell, a game controller button, or a reset button useful.
The way a switch's contacts behave at rest has its own vocabulary. Normally Open (NO) describes a switch whose contacts have no connection when nothing is pressing them — current can't flow until you press the button closed. That's how almost every push button in your kit is wired: press to complete the circuit, release to break it.
Normally Closed (NC) is the opposite arrangement — the contacts are already connected at rest, and pressing the switch is what breaks that connection instead of making it. Many real-world safety switches are deliberately wired NC: a treadmill's safety clip or a machine's emergency guard often keeps a circuit closed only while everything is properly in place, so if a wire ever breaks, the circuit fails to the safe "stopped" state instead of silently staying powered on.
Time to watch a push button do its job. The MicroSim below has three separate momentary buttons, each one completing a branch circuit and lighting its own LED the instant it's pressed.
Diagram: Push Button and LED Circuit
Run the Push Button and LED Circuit MicroSim fullscreen
Push Button and LED Circuit (reused MicroSim)
Type: microsim
sim-id: button-led-breadboard
Library: p5.js
Status: Reused
Source: docs/sims/button-led-breadboard/ (local reuse — already deployed in this same book)
Reused from this book's own MicroSim library (local reuse, not an external-catalog match). Bloom Taxonomy: Understand (L2) / Apply (L3). Bloom Verb: explain, demonstrate. Learning objective: Press a momentary, Normally Open push button and observe animated current flow completing a branch circuit and lighting its LED, connecting the abstract idea of a switch's contacts to a physical, held-down button press.
Notice what happens the instant you let go of a button in that simulation — the dots stop and the LED goes dark immediately. That snap-back is momentary behavior in action, and it's the foundation for everything else in this chapter.
Meet the Switch Family
A push button is perfect when you want something to happen only while you're touching it, but plenty of projects need a switch that stays put. A Latching Switch is any switch that holds whatever position you leave it in — on or off — until you physically move it again, with no springing back required.
Your kit and the wider world of electronics use several different physical shapes for latching switches, and each shape earns its keep in a different kind of project:
- A Toggle Switch is a lever you flip up or down, the same classic shape as a wall light switch, often chosen as a project's main power switch because it's easy to find by feel
- A Slide Switch is a latching switch you slide along a short track instead of flipping — compact and common inside toys and small battery compartments
- A Rocker Switch works like a tiny seesaw: press one end down and it stays down, press the other end and it tips back — the shape you'll recognize from power strips and kitchen appliances
- A DIP Switch is a strip of several tiny latching switches sharing one small plastic housing, sized and spaced exactly like the chips from Chapter 15 so it plugs straight into a breadboard, letting you set a whole bank of on/off configuration options at once
Every one of these switches also has a "shape" to its internal wiring, described using pole-and-throw language borrowed from railroad switches. An SPST Switch — Single Pole, Single Throw — is the simplest wiring of all: one input, one output, on or off, nothing more. Most push buttons and many toggle switches are SPST. An SPDT Switch — Single Pole, Double Throw — has one input that can connect to either of two different outputs, exactly like a train-track switch sending a single incoming train down one of two possible tracks instead of just stopping or going. Here's how the whole switch family compares side by side.
Open the Switch Family Explorer fullscreen
| Switch Type | Momentary or Latching? | Typical Wiring | Common Use |
|---|---|---|---|
| Push Button (Tactile) | Momentary | SPST, usually NO | Doorbells, game controllers, reset buttons |
| Toggle Switch | Latching | SPST or SPDT | Wall light switches, main power switches |
| Slide Switch | Latching | SPST or SPDT | Toys, small battery compartments |
| Rocker Switch | Latching | SPST or SPDT | Power strips, kitchen appliances |
| DIP Switch | Latching | Several SPST switches in one package | Configuration settings on circuit boards |
Poles Are Inputs, Throws Are Destinations
 Here's a quick way to keep pole and throw straight: the number of poles is how many separate input circuits a switch controls, and the number of throws is how many destinations each pole can be aimed at. SPST aims one input at one destination. SPDT aims one input at either of two — never both at once.
When a Switch "Clicks" Twice: Contact Bounce
Here's something your fingers will never notice, but a fast circuit absolutely will. When two metal contacts inside a switch snap together, they don't touch cleanly on the first try — tiny spring physics make them physically bounce apart and together several times in the space of just a few milliseconds before finally settling.
Contact Bounce is this rapid, unwanted on-off-on-off flickering that happens every time a mechanical switch's contacts open or close, caused by the springy metal parts physically vibrating for a few thousandths of a second before settling into a clean connection. A human pressing a button takes far longer than that to finish the press, so you never feel the bounce — but a fast digital circuit sampling thousands of times a second can "see" every single bounce as a separate press.
That matters more than it might sound. Picture wiring a push button straight to the manual clock pulse input of Chapter 15's 74HC595 shift register: a single physical press, meant to shift in exactly one bit, could accidentally register as three or four rapid presses instead, because the chip is fast enough to catch every bounce.
One Press, Several 'Clicks'
Think of contact bounce like a dropped bouncy ball — it hits the floor, bounces a few tiny times, then settles. Your eyes see one drop. A fast enough camera would catch every little bounce. Digital circuits are that fast camera, and contact bounce is why they sometimes "see" one button press as several.
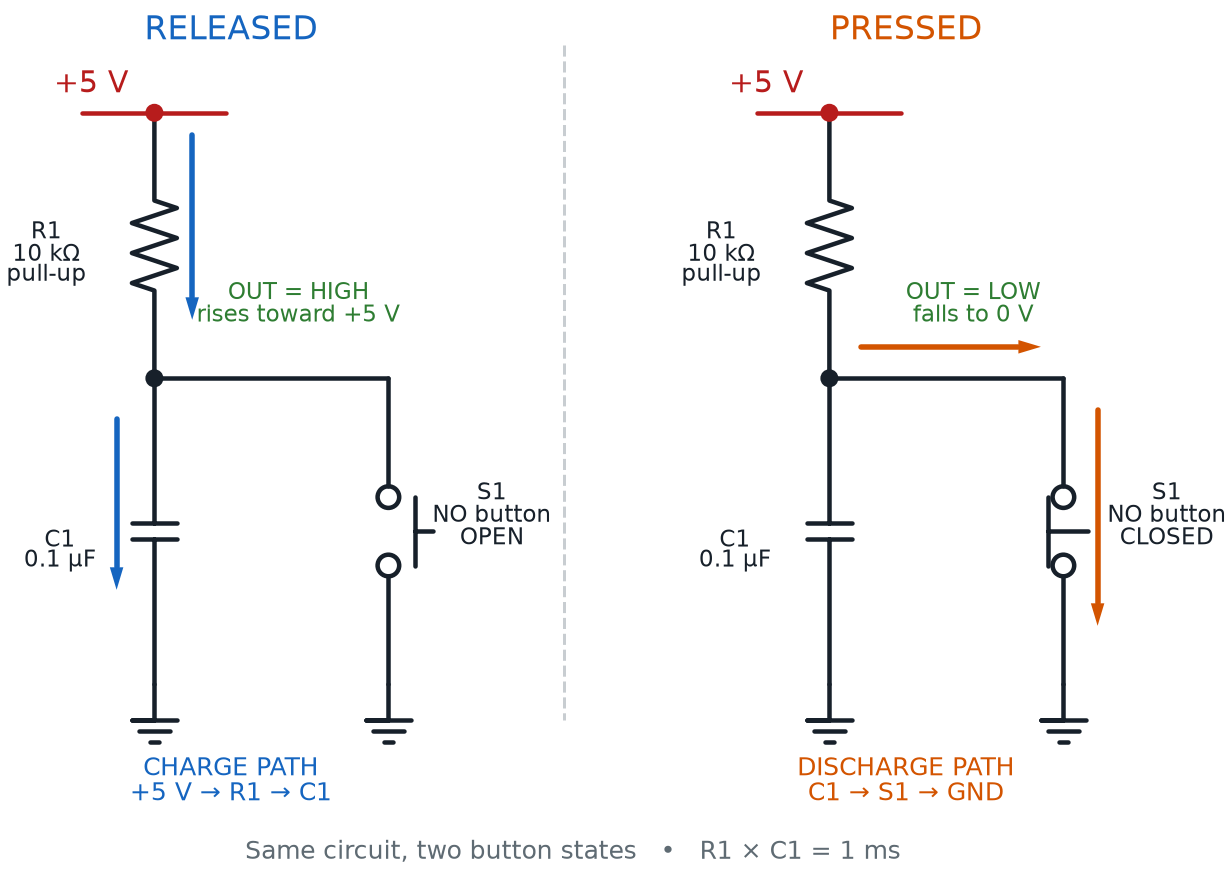
Button Debouncing is the general name for any technique — hardware or software — that cleans up a bouncy switch signal so whatever circuit is listening only ever sees one clean transition per press. This course builds circuits with wires and components, not code, so the debouncing trick worth knowing here is a hardware one.
A Debounce Capacitor is a small capacitor wired across a switch's output, paired with a resistor, so the sudden rapid voltage spikes of contact bounce get smoothed into one gradual, clean transition — the exact same RC charge-and-discharge behavior you explored with capacitors back in Chapters 9 and 10, now put to work solving a real problem.
Diagram: RC Push-Button Debounce Circuit
Debounce Time Constant
where:
- \( \tau \) is the RC time constant, in seconds — roughly how long the capacitor takes to smooth over a bounce
- \( R \) is the resistor value paired with the debounce capacitor, in ohms
- \( C \) is the debounce capacitor's value, in farads
A typical debounce network — a 10 kΩ resistor and a 0.1 µF capacitor — gives \( \tau \) = 1 millisecond, plenty of time to smooth out contact bounce that usually finishes settling within a few milliseconds, all without any lag a human finger could ever notice.
Too Much of a Good Thing
 Bigger isn't always better here. Choose a debounce capacitor that's too large and its RC time constant grows right along with it — suddenly your button feels sluggish and "mushy" because the circuit is genuinely waiting longer to respond. A good debounce capacitor is just barely big enough to smooth the bounce, not a bit bigger.
The Big Reveal: Wiring Logic With Nothing But Switches
You already know how to make one switch turn one LED on and off. Now here's the fun part: wire up a second switch, and where you put it changes everything. Depending on the arrangement, two switches together can behave like a strict gatekeeper that demands both of you show ID, or like a pair of open doors where walking through either one gets you inside.
Those two behaviors have names — AND and OR — and they're the same two logic operations running inside every computer chip ever built. The wild part: you can build both of them right now with wires and switches, no chip involved at all.
You're About to Build Real Logic
 This is the moment a lot of builders remember long after the chapter ends, so don't rush it. Work through both truth tables slowly, predict each row before you check it, and let the "click" happen for yourself. It's worth it.
Series Switch Wiring and Switch AND Logic
Series Switch Wiring connects two or more switches one after another along a single path, so current traveling from the battery has to pass through switch A, then switch B, before it can reach anything else. There's only one route available, and every single switch sitting on that route has to be closed for current to complete the loop.
That single-path arrangement has a direct consequence. Switch AND Logic is the behavior an LED shows when it's wired behind switches in series: it lights up only when switch A and switch B are both closed. Leave either one open and the one and only path is broken, and the LED stays dark no matter what the other switch is doing.
Before looking at the simulation, predict all four rows of this table yourself.
| Switch A | Switch B | LED (Series → AND) |
|---|---|---|
| Open | Open | Off |
| Closed | Open | Off |
| Open | Closed | Off |
| Closed | Closed | On |
Only one out of four combinations lights the LED — the one where both switches agree to close.
Parallel Switch Wiring and Switch OR Logic
Parallel Switch Wiring connects two or more switches so that each one bridges the exact same two points, giving current more than one possible route to choose from. Close any single one of them and current has a complete path, no matter what the other switches are doing.
Switch OR Logic is the resulting behavior: an LED wired behind switches in parallel lights up whenever switch C or switch D — or both — is closed. It only takes one working path out of the available options to complete the circuit. Think of a garage door opener that responds to a wall button or a remote control clicker — either one, on its own, opens the door.
Predict this table too, before checking it against the simulation.
| Switch C | Switch D | LED (Parallel → OR) |
|---|---|---|
| Open | Open | Off |
| Closed | Open | On |
| Open | Closed | On |
| Closed | Closed | On |
Three out of four combinations light the LED this time — only the "everything open" row leaves it dark.
Now flip real switches and watch both truth tables fill themselves in live. The simulation below puts an AND circuit (series, top half) and an OR circuit (parallel, bottom half) on the very same board.
Diagram: Wired Logic — AND and OR Gates from Switches
Run the Wired Logic MicroSim fullscreen
Wired Logic: AND and OR (reused MicroSim)
Type: microsim
sim-id: wired-logic-and-or
Library: p5.js
Status: Reused
Source: docs/sims/wired-logic-and-or/ (local reuse — already deployed in this same book)
Reused from this book's own MicroSim library (local reuse, not an external-catalog match). Bloom Taxonomy: Apply (L3). Bloom Verb: demonstrate, predict, verify. Learning objective: Given any combination of open and closed latching switches, predict whether a series-wired (AND) or parallel-wired (OR) LED circuit completes, then verify the prediction by flipping switches and reading a live, self-filling truth table.
Watch the animated current in that simulation closely — it only ever moves along a completed path. With switch A closed but B open, the dots simply stop the instant they reach B's open contact. That dead-end is the "Off" row of the AND table, made visible on the wires themselves.
One Path Needs Everyone, Many Paths Need Just One
Here's the whole idea in one line: series wiring gives current exactly one path, so everyone on that path must cooperate — that's AND. Parallel wiring gives current several paths, so just one needs to cooperate — that's OR. Remember that sentence and you'll never mix the two up again.
A logic gate, it turns out, was never really about the chip. It's about the shape of the wiring — one path demanding full agreement, or many paths settling for just one. Real computer chips build their AND and OR gates out of transistors instead of switches, packed by the billions onto a sliver of silicon, but the underlying idea you just wired by hand is exactly the same one running inside every phone, laptop, and computer on the planet.
Chapter Summary: Key Takeaways
You started with a single click and ended up building real logic with nothing but wire. Here's what's now part of your toolkit:
- Push Buttons and Tactile Buttons are Momentary Switches, usually wired Normally Open, that connect only while pressed; Normally Closed switches do the reverse and are often used for fail-safe wiring
- A 4-Pin Push Button hides only two real connections behind four legs — two permanently joined pairs, bridged together the moment you press
- Latching Switches — Toggle, Slide, Rocker, and DIP Switches — hold their position until moved again, and each has an SPST or SPDT contact arrangement describing how many destinations a single input can reach
- Contact Bounce turns one clean press into several rapid, unwanted transitions; Button Debouncing, often using a Debounce Capacitor and the RC time constant from Chapters 9-10, smooths that noise into one clean signal
- Series Switch Wiring gives current one path and builds Switch AND Logic — every switch must close; Parallel Switch Wiring gives current multiple paths and builds Switch OR Logic — just one switch needs to close
Chapter 17 keeps the "no chip" streak going, swapping a hand-operated switch for a component that flips itself: a photoresistor that senses light and darkness, on its way to building an automatic night light.
Logic Gate Builder: Unlocked
 Huge one, builder! You just built a real logic gate out of nothing but wires and switches — that's the exact same idea humming away inside every computer chip on Earth, and now it's officially one of your superpowers. Current's flowing your way — see you in Chapter 17, where the next switch flips itself!