Powering Your MicroPython Projects
Welcome to This Lab
 In this lab, you will learn how to power your Pico projects — from USB cables to batteries. Let's make sure your projects always have the energy they need!
When you are learning to code, you can power your Pico using a USB cable from your computer. But what if your project needs to move around — like a robot? Then you need a battery. The good news is that the Pico supports many power options.
Be careful about how much power you connect. The Pico and most modern microcontrollers run on 3.3 volts (V). Older boards like the Arduino ran on 5 V. If you connect too many batteries in a row, the extra voltage can damage your Pico.
Power Connectors
The Raspberry Pi Pico has three important power connectors you should learn about.
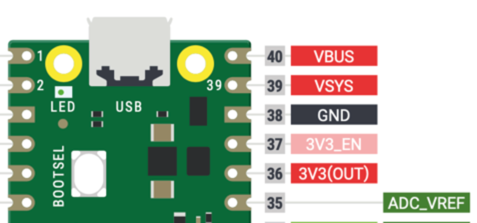
- VBUS — Connects directly to the USB port's power. It appears in the upper-right corner of the Pico. When you plug in a USB cable, the Pico automatically uses this power source. This is the best way to power the Pico during development or when using a USB battery pack.
- VSYS — This is the main power input when you are not using USB. The Pico can accept between 1.8 V and 5.5 V here. This means even a set of three AAA batteries — which starts at 4.5 V and slowly drops — will work right down to 1.8 V. The Pico uses a built-in Switched-Mode Power Supply (SMPS) to turn whatever voltage you give it into a steady 3.3 V.
- 3V3_EN — This pin controls the built-in power supply. Pulling this pin low (connecting it to ground) turns off the 3.3 V supply and powers down the Pico. You can use it to save battery by turning off the Pico from another circuit.
- 3.3OUT — This pin provides 3.3 V power to other parts of your circuit. Keep the total current below 300 milliamps (mA) — that is about 15 LEDs running at full brightness at the same time.
- ADC_VREF — This is a special reference pin for the Analog-to-Digital Converter (ADC). Only use it to provide a steady voltage reference for your analog inputs, such as potentiometers. It is kept away from the noisier 3.3OUT power to give cleaner readings.
Watch Out!
 Never connect 4 AA batteries directly to VSYS. Four AA batteries give 6 V total, which is too high and could damage your Pico. Use 3 AA batteries instead, or use a voltage regulator.
USB Battery Packs

USB battery packs — the kind people use to charge phones — work great for powering a Pico. You can buy them in many sizes, from 2,500 milliamp-hours (mAh) up to very large capacities. A larger mAh number means the battery lasts longer before you need to recharge it.
Preventing USB Power Pack Autoshutdown
Most USB battery packs automatically shut off when they do not sense enough current being drawn. They usually need to sense about 10 mA or more. In many projects, the Pico draws less than that. One simple fix is to add a small LED to your circuit. The LED draws about 10 mA on its own, which keeps the battery pack from shutting off.
Battery Power
Three AA alkaline batteries wired in series give plenty of power for small Pico-based projects. Each AA battery gives 1.5 V, so three together give 4.5 V total. That is well within the 1.8 V–5.5 V range that VSYS accepts.
You can also use four rechargeable NiCad batteries. Each NiCad battery gives about 1.2 V, so four together give 4.8 V — still safely under the 5.5 V limit.
Warning
Do not connect 4 AA batteries directly to VSYS. 6 volts is too high for the Pico's power system and could damage it. Use a voltage regulator such as is found on motor driver boards. Another alternative is to use a DC-to-DC voltage regulator such as a Buck Converter.
Monitoring USB Power
The Pico has a special pin, GP24, that tells you whether power is coming from the USB cable. You can use this in your program to change how the Pico behaves. For example, you could slow things down to save battery when USB is not connected.
See here
Here is sample MicroPython code that checks USB power and blinks differently based on the result:
1 2 3 4 5 6 7 8 9 10 11 12 13 | |
What each line does:
import machine— loads the hardware control toolsimport utime— loads the time tools for delaysled_onboard = machine.Pin(25, machine.Pin.OUT)— creates a pin object for the built-in LEDusb_power = machine.Pin(24, machine.Pin.IN)— creates a pin object that reads USB power statuswhile True:— loops foreverled_onboard.value(1)— turns the LED onutime.sleep(0.5)— pauses for half a secondled_onboard.value(0)— turns the LED offutime.sleep(0.5)— pauses for half a secondif usb_power() != 1:— checks if USB power is missingutime.sleep(1)— adds an extra pause when running on battery
Monty's Tip
 Running on battery? You can use GP24 to check. When USB is disconnected, your program can slow down or sleep to make the battery last longer.
This program prints out the value of the USB Power indicator.
1 2 3 4 5 6 7 8 9 10 | |
What each line does:
import machine— loads the hardware control toolsimport utime— loads the time toolsled_onboard = machine.Pin(25, machine.Pin.OUT)— creates the LED pin objectusb_power = machine.Pin(24, machine.Pin.IN)— creates the USB-power-check pinif usb_power() == 1:— checks if USB power is present (1 = yes)print('drawing power from the USB')— shows a message when USB is connectedelse:— runs the next line when USB is not connectedprint('drawing power from VSYS...')— shows a message when on battery
Power use when running this code is about 0.1 W (19 mA at 4.99 V). Four AA batteries (about 2,000 mAh each) could keep the Pico running for more than 4 days.
Running both USB and External Battery Power on the Raspberry Pi Pico
You can connect both a USB cable and a battery to the Pico at the same time. The battery voltage should stay between 1.8 V and 5.5 V. If both are connected, you should place a Schottky diode between the battery positive and VSYS — see sections 4.4 and 4.5 of the Raspberry Pi Pico Datasheet. As long as the battery voltage is lower than the USB voltage, the Pico will draw power from USB. When you unplug the USB cable, the Pico will switch to battery power automatically.
Monitoring Battery Power Level on the Raspberry Pi Pico
You can use one of the three Analog-to-Digital Converter (ADC) inputs to monitor how much power is left in an external battery. For example, if you have 3 AA batteries, connect two 100K ohm resistors in series between the battery's positive and negative terminals. Then connect the middle point (between the two resistors) to one of the ADC input pins. This creates a voltage divider that gives you a safe, scaled-down version of the battery voltage. A full battery at 4.5 V will show about half of the maximum ADC reading. As the voltage drops to 1.8 V, the reading will approach zero. You can display the result on an OLED screen to show how much battery life is left.
Great Work!
 You now understand how to power your Pico projects! In the next lab, you will connect your first components and write programs to control them.