Skip to content

ILI9341 TFT Display

Welcome to the ILI9341 Color Display Lab

Monty waving welcome In this lab, you will connect a 3.2-inch color display and write code to show text and colorful rectangles. Get ready to fill the screen with color!

ILI 9341 Display Demo

What Is This Display?

The ILI9341 is a Thin-Film Transistor (TFT) color display. TFT is a technology that makes each pixel very bright and clear. This display is 3.2 inches across. It shows 240 pixels tall and 320 pixels wide — a sharp, colorful screen.

You can buy this display for about $10 on Amazon or eBay.

ILI 9341 Display Listing

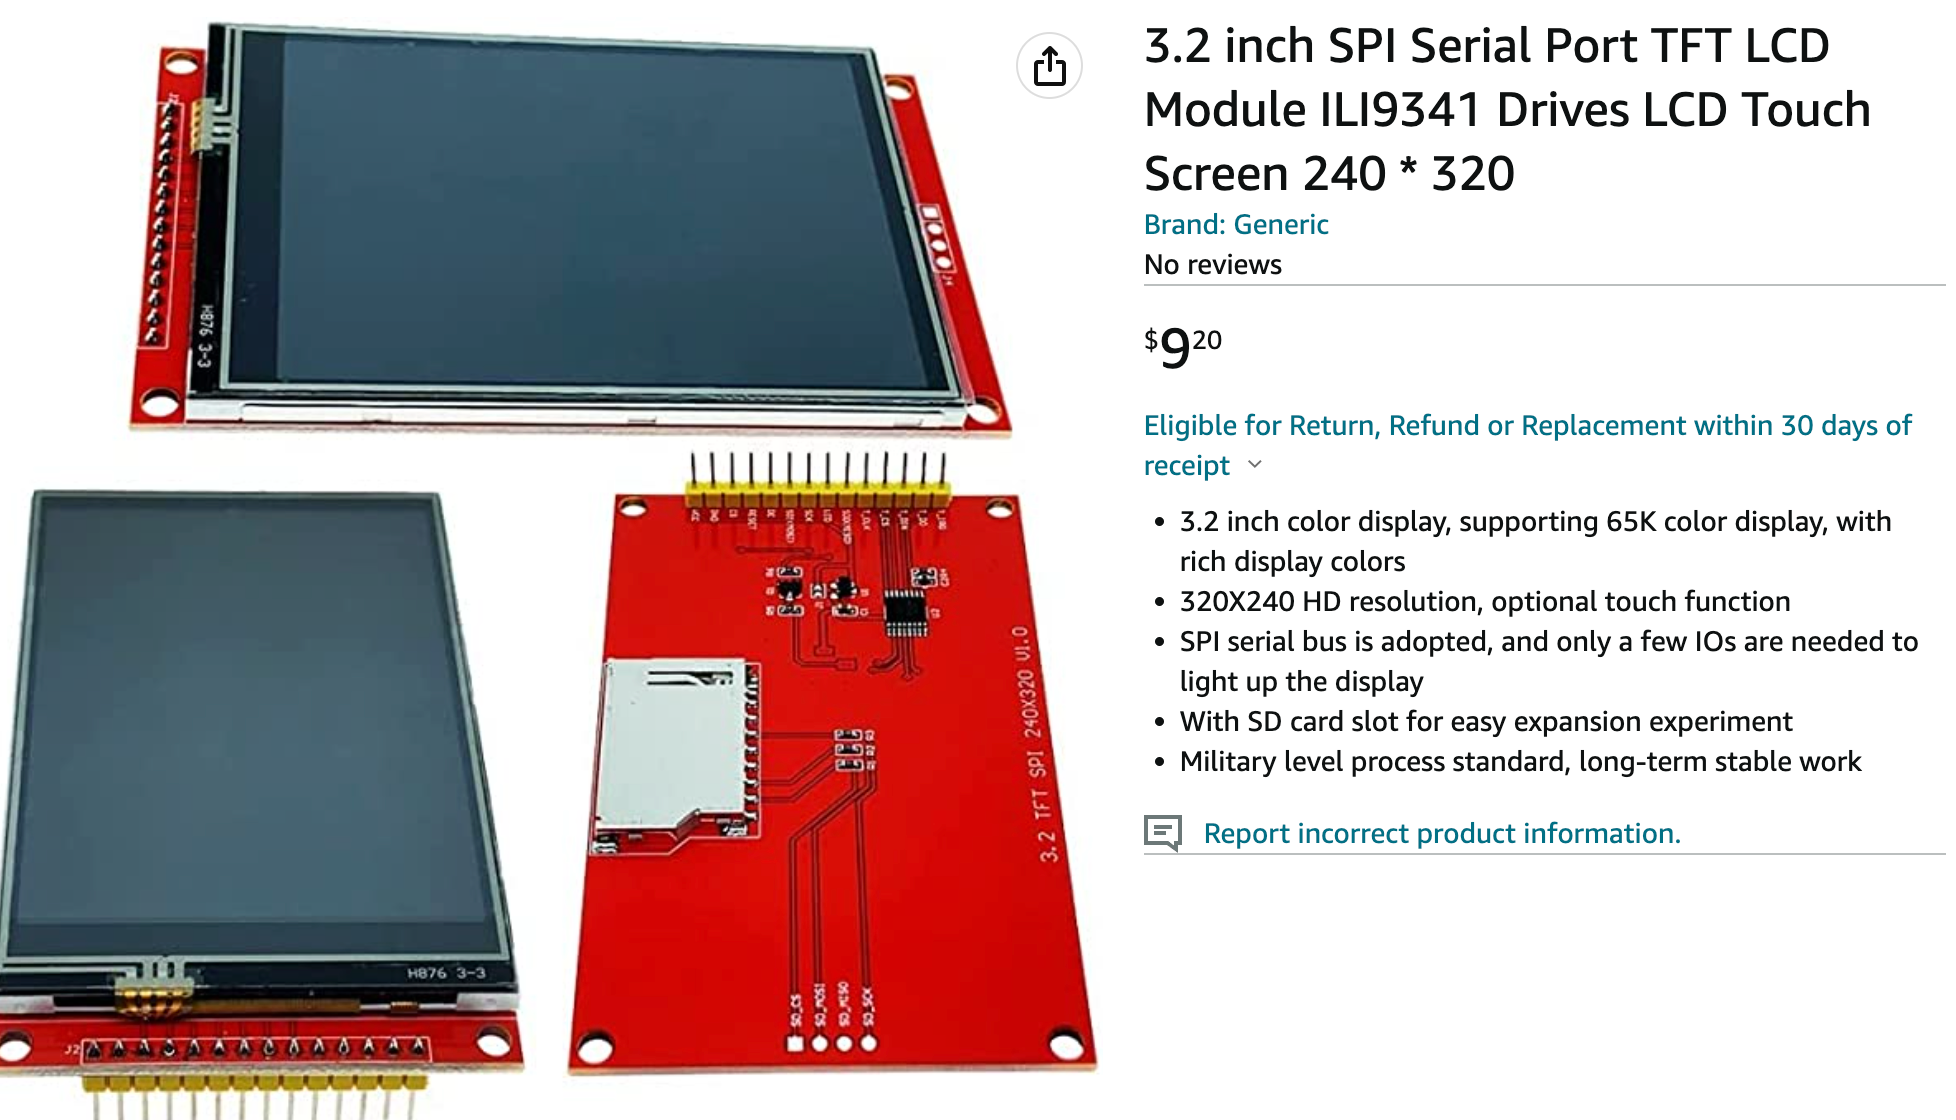
The display also has a touch screen and an SD card slot. However, MicroPython drivers for those extra features are not yet available.

How Color Works on This Display

This display uses a 16-bit color format called RGB565. Each pixel stores 16 bits of color information:

  1. 5 bits for red (32 shades)
  2. 6 bits for green (64 shades)
  3. 5 bits for blue (32 shades)

To use colors in your code, you call the color565() function. You give it red, green, and blue values from 0 to 255. It converts them into the 16-bit format the display understands.

For example, to make yellow:

1
yellow = color565(255, 255, 0)   # full red + full green + no blue = yellow

Why RGB565?

Monty thinking Storing 16 bits per pixel instead of 24 bits saves memory and makes the display faster to update. RGB565 gives you 65,536 different colors — more than enough for great-looking graphics!

Wiring the Display

Connect the ILI9341 to the Pico using these steps:

  1. Connect the display's SCK pin to Pico GP2 (the SPI clock).
  2. Connect the display's SDI (MOSI) pin to Pico GP3 (the SPI data line).
  3. Connect the display's DC pin to Pico GP4 (data or command select).
  4. Connect the display's RESET pin to Pico GP5.
  5. Connect the display's CS pin to Pico GP6 (chip select).
  6. Connect the display's VCC pin to the Pico's 3.3V pin.
  7. Connect the display's GND pin to the Pico's GND pin.

Hello World Example

 1
 2
 3
 4
 5
 6
 7
 8
 9
10
11
12
13
14
15
16
17
18
19
20
21
22
23
# print "Hello World!" in landscape mode using a 32-pixel-tall bold font
# default is white text on a black background
from ili934x import ILI9341    # import the ILI9341 display driver
from machine import Pin, SPI   # import GPIO and SPI tools
import tt32                    # import the 32-pixel font

# pin number constants — giving names to pin numbers makes code easier to read
SCK_PIN  = 2    # SPI clock pin
MISO_PIN = 3    # SPI data pin (labeled SDI or MOSI on the back of the display)
DC_PIN   = 4    # data or command select pin
RESET_PIN = 5   # display reset pin
CS_PIN   = 6    # chip select pin

# set up the SPI bus at 20 million bits per second
spi = SPI(0, baudrate=20000000, mosi=Pin(MISO_PIN), sck=Pin(SCK_PIN))

# create the display object: 320 wide, 240 tall, in landscape rotation (r=3)
display = ILI9341(spi, cs=Pin(CS_PIN), dc=Pin(DC_PIN), rst=Pin(RESET_PIN), w=320, h=240, r=3)

display.erase()          # clear the screen to black
display.set_font(tt32)  # choose the 32-pixel font
display.set_pos(0, 0)   # move the text cursor to the top-left corner
display.print('Hello World!')   # draw the text on the screen

What Each Line Does

  1. from ili934x import ILI9341 — loads the driver that knows how to talk to the ILI9341 chip.
  2. import tt32 — loads a 32-pixel-tall font for large, easy-to-read text.
  3. SCK_PIN = 2 through CS_PIN = 6 — gives each wire a clear name.
  4. spi = SPI(0, baudrate=20000000, ...) — starts SPI bus 0 at 20 million bits per second.
  5. display = ILI9341(...) — creates the display object with size, rotation, and pin settings.
  6. r=3 — sets landscape rotation with (0,0) at the top-left, pins on the left side.
  7. display.erase() — fills the whole screen with black.
  8. display.set_font(tt32) — selects the large 32-pixel font.
  9. display.set_pos(0, 0) — moves the text cursor to column 0, row 0 (top-left corner).
  10. display.print('Hello World!') — draws the text at the current cursor position.

Draw Random Rectangles

 1
 2
 3
 4
 5
 6
 7
 8
 9
10
11
12
13
14
15
16
17
18
19
20
21
22
23
24
25
26
27
28
29
30
31
32
33
34
35
36
37
38
39
40
41
42
43
44
45
46
47
48
49
50
51
52
53
54
55
56
57
58
59
60
61
from ili934x import ILI9341, color565   # import driver and color helper
from machine import Pin, SPI
from utime import sleep
from random import randint              # import random number generator

WIDTH      = 320    # screen width in pixels
HALF_WIDTH = int(WIDTH / 2)    # half the width (used for random positions)
HEIGHT     = 240    # screen height in pixels
HALF_HEIGHT = int(HEIGHT / 2)  # half the height
ROTATION   = 3     # landscape mode with 0,0 at top-left, pins on left

SCK_PIN  = 2
MISO_PIN = 3
DC_PIN   = 4
RST_PIN  = 5
CS_PIN   = 6

spi = SPI(0, baudrate=20000000, mosi=Pin(MISO_PIN), sck=Pin(SCK_PIN))
display = ILI9341(spi, cs=Pin(CS_PIN), dc=Pin(DC_PIN), rst=Pin(RST_PIN), w=WIDTH, h=HEIGHT, r=ROTATION)
display.erase()   # start with a black screen

# convert RGB values to the 16-bit color format the display uses
black      = color565(0, 0, 0)
white      = color565(255, 255, 255)
red        = color565(255, 0, 0)
green      = color565(0, 255, 0)
blue       = color565(0, 0, 255)
yellow     = color565(255, 255, 0)
cyan       = color565(0, 255, 255)
magenta    = color565(255, 0, 255)
gray       = color565(128, 128, 128)
light_gray = color565(192, 192, 192)
dark_gray  = color565(64, 64, 64)
brown      = color565(165, 42, 42)
orange     = color565(255, 60, 0)
# 150 for the green and blue wash out the colors
pink       = color565(255, 130, 130)
purple     = color565(128, 0, 128)
lavender   = color565(150, 150, 200)
beige      = color565(200, 200, 150)
# by definition, maroon is 50% of the red on, but 128 is way too bright
maroon     = color565(105, 0, 0)
olive      = color565(128, 128, 0)
turquoise  = color565(64, 224, 208)
dark_green = color565(0, 100, 0)

color_list = [white, red, green, blue, yellow, cyan, magenta,
              gray, light_gray, dark_gray, brown, orange, pink, purple, lavender,
              beige, maroon, olive, turquoise, dark_green, black]
color_num = len(color_list)   # count how many colors are in the list

# Draw rectangles forever
while True:
    # pick a random position and size in the left half of the screen
    x      = randint(0, HALF_WIDTH)
    y      = randint(0, HALF_HEIGHT)
    width  = randint(0, HALF_WIDTH)
    height = randint(0, HALF_HEIGHT)
    color  = color_list[randint(0, color_num - 1)]   # pick a random color
    print('fill_rectangle(', x, y, width, height, color)
    display.fill_rectangle(x, y, width, height, color)   # draw the colored rectangle

What Each Line Does

  1. from random import randint — loads the random number generator for random positions and sizes.
  2. WIDTH = 320, HEIGHT = 240 — store the screen size so all code uses the same values.
  3. ROTATION = 3 — landscape mode with (0,0) at the top-left corner.
  4. color565(...) for each color — converts normal RGB values to the 16-bit format.
  5. color_list = [...] — puts all color values into a list so we can pick one randomly.
  6. color_num = len(color_list) — counts the colors so we can pick a valid random index.
  7. while True: — runs forever so new rectangles keep appearing.
  8. randint(0, HALF_WIDTH) — picks a random number between 0 and half the screen width.
  9. display.fill_rectangle(x, y, width, height, color) — draws a filled rectangle at the chosen position.

Show a Color List

One great way to learn about colors is to show each color as a large rectangle with its name below it.

 1
 2
 3
 4
 5
 6
 7
 8
 9
10
11
12
13
14
15
16
17
18
19
20
21
22
23
24
25
26
27
28
29
30
31
32
33
34
35
36
37
38
39
40
41
42
43
44
45
46
47
48
49
50
51
52
53
54
55
56
57
58
59
60
61
62
63
64
65
66
67
68
69
70
71
from ili934x import ILI9341, color565
from machine import Pin, SPI
from utime import sleep
from random import randint
import tt32                 # import the 32-pixel font for color names

WIDTH       = 320
HALF_WIDTH  = int(WIDTH / 2)
HEIGHT      = 240
HALF_HEIGHT = int(HEIGHT / 2)
ROTATION    = 3
SCK_PIN  = 2
MISO_PIN = 3
DC_PIN   = 4
RST_PIN  = 5
CS_PIN   = 6

spi = SPI(0, baudrate=20000000, mosi=Pin(MISO_PIN), sck=Pin(SCK_PIN))
display = ILI9341(spi, cs=Pin(CS_PIN), dc=Pin(DC_PIN), rst=Pin(RST_PIN), w=WIDTH, h=HEIGHT, r=ROTATION)
display.set_font(tt32)   # use the large font for color names
display.erase()

# color definitions converted to 565 representations
black      = color565(0, 0, 0)
white      = color565(255, 255, 255)
red        = color565(255, 0, 0)
green      = color565(0, 255, 0)
blue       = color565(0, 0, 255)
yellow     = color565(255, 255, 0)
cyan       = color565(0, 255, 255)
magenta    = color565(255, 0, 255)
gray       = color565(128, 128, 128)
light_gray = color565(192, 192, 192)
dark_gray  = color565(64, 64, 64)
brown      = color565(165, 42, 42)
orange     = color565(255, 60, 0)
# 150 for the green and blue wash out the colors
pink       = color565(255, 130, 130)
purple     = color565(128, 0, 128)
lavender   = color565(150, 150, 200)
beige      = color565(200, 200, 150)
# by definition, maroon is 50% of the red on, but 128 is way too bright
maroon     = color565(105, 0, 0)
olive      = color565(128, 128, 0)
turquoise  = color565(64, 224, 208)
dark_green = color565(0, 100, 0)

color_list = [white, red, green, blue, yellow, cyan, magenta,
              gray, light_gray, dark_gray, brown, orange, pink, purple, lavender,
              beige, maroon, olive, turquoise, dark_green, black]
color_names = ['white (255,255,255)', 'red (255,0,0)', 'green (0,255,0)', 'blue (0,0,255)', 'yellow (255,255,0)',
               'cyan (0,255,255)', 'magenta (255,0,255)',
               'gray (128,128,128)', 'light gray (192,192,192)', 'dark gray (64,64,64)',
               'brown (165,42,42)', 'orange (255,60,0)', 'pink (255,130,130)', 'purple (128,0,128)',
               'lavender (150,150,200)',
               'beige (200,200,150)', 'maroon (105,0,0)', 'olive (128,128,0)', 'turquoise (64,224,208)',
               'dark green (0,100,0)', 'black (0,0,0)']
color_num = len(color_list)

display.fill_rectangle(0, 0, WIDTH, HEIGHT, black)   # start with a black screen
while True:
    for i in range(0, color_num):
        # fill the top part of the screen with the color
        display.fill_rectangle(0, 0, WIDTH, HEIGHT - 33, color_list[i])
        # put a black strip at the bottom for the color name text
        display.fill_rectangle(0, HEIGHT - 32, WIDTH, 32, black)
        # move the text cursor to the bottom strip
        display.set_pos(0, HEIGHT - 32)
        display.print(color_names[i])   # show the color name in white text
        print(color_names[i])           # also print it to the console
        sleep(1)                        # wait 1 second before showing the next color

What Each Line Does

  1. color_names = [...] — stores the name of each color as a string with RGB values.
  2. display.fill_rectangle(0, 0, WIDTH, HEIGHT, black) — fills the whole screen with black to start.
  3. for i in range(0, color_num): — loops through every color in the list.
  4. display.fill_rectangle(0, 0, WIDTH, HEIGHT - 33, color_list[i]) — fills most of the screen with the current color.
  5. display.fill_rectangle(0, HEIGHT - 32, WIDTH, 32, black) — draws a black strip at the bottom for the label.
  6. display.set_pos(0, HEIGHT - 32) — moves the text cursor to the black strip.
  7. display.print(color_names[i]) — draws the color name in white.
  8. sleep(1) — pauses for 1 second before moving to the next color.

Screen Update Speed

One thing to know about this display: it is slow to refresh. Sending the full screen of 240 by 320 pixels — with 2 bytes of color per pixel — takes a long time over SPI. This makes smooth animation difficult with this setup.

Ball Bounce Animation

Here is a simple ball bounce animation. It runs slowly and has some flicker, but it shows how animation works:

 1
 2
 3
 4
 5
 6
 7
 8
 9
10
11
12
13
14
15
16
17
18
19
20
21
22
23
24
25
26
27
28
29
30
31
32
33
34
35
36
37
38
39
40
41
42
43
44
45
46
47
48
49
50
51
52
53
54
55
56
57
58
59
from ili934x import ILI9341, color565
from machine import Pin, SPI
from utime import sleep

WIDTH    = 320
HEIGHT   = 240
ROTATION = 3   # landscape mode
SCK_PIN  = 2
MISO_PIN = 3
DC_PIN   = 4
RST_PIN  = 5
CS_PIN   = 6

spi = SPI(0, baudrate=20000000, mosi=Pin(MISO_PIN), sck=Pin(SCK_PIN))
display = ILI9341(spi, cs=Pin(CS_PIN), dc=Pin(DC_PIN), rst=Pin(RST_PIN), w=WIDTH, h=HEIGHT, r=ROTATION)
display.erase()

# set up colors using the 565 format
black = color565(0, 0, 0)
white = color565(255, 255, 255)
red   = color565(255, 0, 0)
green = color565(0, 255, 0)
blue  = color565(0, 0, 255)

# ok, not really a circle — just a square for now
def draw_ball(x, y, size, color):
    if size == 1:
        display.pixel(x, y, color)              # draw a single pixel for tiny balls
    else:
        display.fill_rectangle(x, y, size, size, color)   # draw a filled square

ball_size = 20                    # the ball is 20 pixels wide and tall
current_x = int(WIDTH / 2)       # start the ball in the middle horizontally
current_y = int(HEIGHT / 2)      # start the ball in the middle vertically
direction_x = 1                  # start moving right (positive x direction)
direction_y = -1                 # start moving up (negative y direction)

# Bounce forever
while True:
    draw_ball(current_x, current_y, ball_size, white)   # draw the ball in white
    sleep(0.1)                                          # wait 0.1 seconds
    draw_ball(current_x, current_y, ball_size, black)  # erase the old ball

    # check the left edge
    if current_x < 0:
        direction_x = 1    # bounce right
    # check the right edge
    if current_x > WIDTH - ball_size - 2:
        direction_x = -1   # bounce left
    # check the top edge
    if current_y < 0:
        direction_y = 1    # bounce down
    # check the bottom edge
    if current_y > HEIGHT - ball_size - 2:
        direction_y = -1   # bounce up

    # move the ball by one step in the current direction
    current_x = current_x + direction_x
    current_y = current_y + direction_y

What Each Line Does

  1. def draw_ball(x, y, size, color): — defines a function that draws a square ball at any position with any color.
  2. display.pixel(x, y, color) — draws a single dot (used when size is 1).
  3. display.fill_rectangle(...) — draws a filled square (used for all other sizes).
  4. ball_size = 20 — sets the ball to be 20 pixels wide and tall.
  5. current_x, current_y — track the ball's current position on the screen.
  6. direction_x = 1, direction_y = -1 — the ball starts moving right and upward.
  7. draw_ball(..., white) — draws the ball in white so you can see it.
  8. sleep(0.1) — pauses briefly so you can see the ball before it moves.
  9. draw_ball(..., black) — erases the old ball by drawing it in black (the background color).
  10. Edge checks — if the ball hits any edge, the matching direction flips to make it bounce.
  11. current_x = current_x + direction_x — moves the ball one pixel in the current direction.

Monty's Tip

Monty giving a tip The ball flickers because erasing and redrawing over SPI is slow. For smooth animation, look for displays with faster interfaces or built-in frame buffers.

References

  1. Jeffmer's GitHub library — includes four fonts (sizes 8, 14, 24, and 32 pixels)
  2. Amazon — HiLetgo ILI9341 2.8" SPI TFT LCD Display Touch Panel 240x320
  3. eBay Listing

Great Work!

Monty celebrating You connected a large color TFT display, showed text and a color parade, and even made a bouncing ball animation! You are building real graphical programs now.