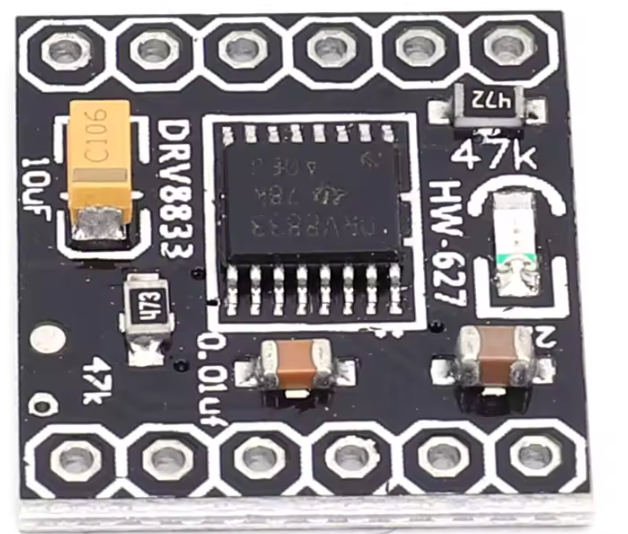
DRV8833 2-Channel DC Motor Driver Module
Welcome to the DRV8833 Lab
 The DRV8833 is a tiny, powerful motor driver chip that works great with the Raspberry Pi Pico. It is one of the best choices for small robots and projects that need two motors. Let's explore it together!
Overview
The DRV8833 is a low-cost (about $2) compact dual H-bridge motor driver. It is based on Texas Instruments' DRV8833 integrated circuit (IC). An IC is a complete circuit packed into a tiny chip package.
The DRV8833 is designed to control two DC motors independently — or one stepper motor — in both forward and reverse directions. It is popular in robotics and hobby electronics because it works with low-voltage logic (as low as 2.7 V) and can supply moderate motor current without complex wiring.
You can find the DRV8833 module on eBay for under $2.
Key Idea
 The DRV8833 works directly with the Pico's 3.3 V signals — no level shifter needed. This makes wiring simple and reduces the number of parts in your project.
Key Features
| Feature | Specification |
|---|---|
| Motor channels | 2 (dual H-bridge) |
| Motor voltage | 2.7 V to 10.8 V (VM pin) |
| Logic voltage | 2.7 V to 7 V (works with 3.3 V and 5 V) |
| Continuous output current | about 1.2 A per channel |
| Peak output current | about 2 A per channel (short bursts) |
| Control interface | PWM and direction pins |
| Built-in protection | Over-current, short-circuit, under-voltage lockout, thermal shutdown |
| Dimensions | about 18 mm × 16 mm (varies by manufacturer) |
How It Works
The DRV8833 contains two full H-bridges, each able to drive a motor forward or backward.
Each motor uses two logic inputs:
AIN1andAIN2for Motor ABIN1andBIN2for Motor B
By setting one input HIGH and the other LOW, you set the motor direction. By applying Pulse-Width Modulation (PWM) to one input, you control both speed and direction at the same time. The chip also supports brake mode (motor stops quickly) and coast mode (motor slows down gradually).
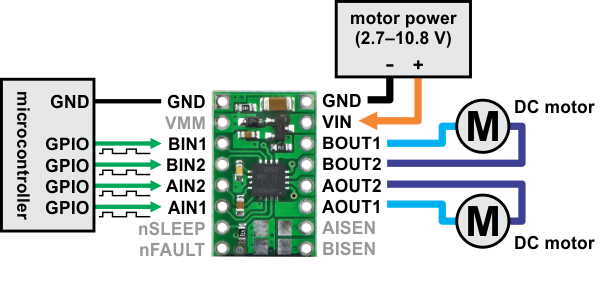
Typical Pinout
| Pin | Function |
|---|---|
| VM | Motor power supply (2.7 V to 10.8 V) — connect to your battery |
| GND | Ground |
| AIN1, AIN2 | Control inputs for Motor A |
| BIN1, BIN2 | Control inputs for Motor B |
| AO1, AO2 | Motor A output wires |
| BO1, BO2 | Motor B output wires |
| nSLEEP | Set LOW to put the chip to sleep; set HIGH to keep it running |
Some breakout boards connect the nSLEEP pin directly to VCC so the chip is always active. You do not need to control it in your code.
Wiring Steps
Connect the DRV8833 module to the Pico and your motors like this:
- Connect the module's VM pin to your battery pack positive wire (2.7 V to 10.8 V).
- Connect the module's GND pin to the battery pack negative wire and to the Pico's GND.
- Connect AIN1 to Pico GP0.
- Connect AIN2 to Pico GP1.
- Connect BIN1 to Pico GP2.
- Connect BIN2 to Pico GP3.
- Connect AO1 and AO2 to the two wires of Motor A.
- Connect BO1 and BO2 to the two wires of Motor B.
- If your board has a separate nSLEEP pin (not tied to power), connect it to Pico GP4.
Watch Out!
 Keep the motor battery voltage at or below 10.8 V. Going over the maximum voltage can permanently damage the DRV8833 chip.
Sample Code: Forward, Backward, and Stop
1 2 3 4 5 6 7 8 9 10 11 12 13 14 15 16 17 18 19 20 21 22 23 24 25 26 27 28 29 30 31 32 33 34 35 36 37 38 39 40 41 42 43 44 45 46 47 48 49 50 | |
What Each Line Does
| Line | Purpose |
|---|---|
PWM(Pin(0)) |
Creates a PWM output on GP0 to control speed |
motor_a_in1.freq(1000) |
Sets 1000 Hz PWM — fast enough for smooth motor control |
motor_a_in1.duty_u16(motor_speed) |
Sets the speed — higher value = faster |
motor_a_in2.duty_u16(0) |
Sets AIN2 to 0 — this determines the forward direction |
duty_u16(65535) |
Both at max (100%) = brake mode — motor stops quickly |
duty_u16(0) for both |
Both at 0% = coast mode — motor slows on its own |
Advantages of the DRV8833
- Works directly with 3.3 V and 5 V logic — no extra components needed.
- Compact and lightweight — great for small robots.
- Quiet operation with PWM up to about 250 kHz.
- Built-in fault protection reduces the risk of damage.
- Lower voltage loss than the L293D — motors get more power from the same battery.
Common Uses
- Small robot cars with two DC motors
- Driving a single bipolar stepper motor
- Pan-tilt camera platforms
- Automated toys
- Small conveyor belts or mechanisms in DIY projects
Monty's Tip
 The DRV8833 is a great upgrade from the L293D. It wastes less power, so your motors run stronger and your batteries last longer. For small robots, the DRV8833 is usually the better choice.
References
Outstanding Work!
 You have learned how to use the DRV8833 — one of the best small motor drivers available. You can now control two motors, change direction, set speed with PWM, and even brake quickly. Your robot-building skills are growing fast!