NeoPixel Matrix Display
Welcome to the NeoPixel Matrix Lab
 A NeoPixel matrix is a grid of colorful smart LEDs — all controlled by a single wire! You will learn to draw pixels, bounce a ball, and even scroll text across the display. Let's build something amazing!
Introduction
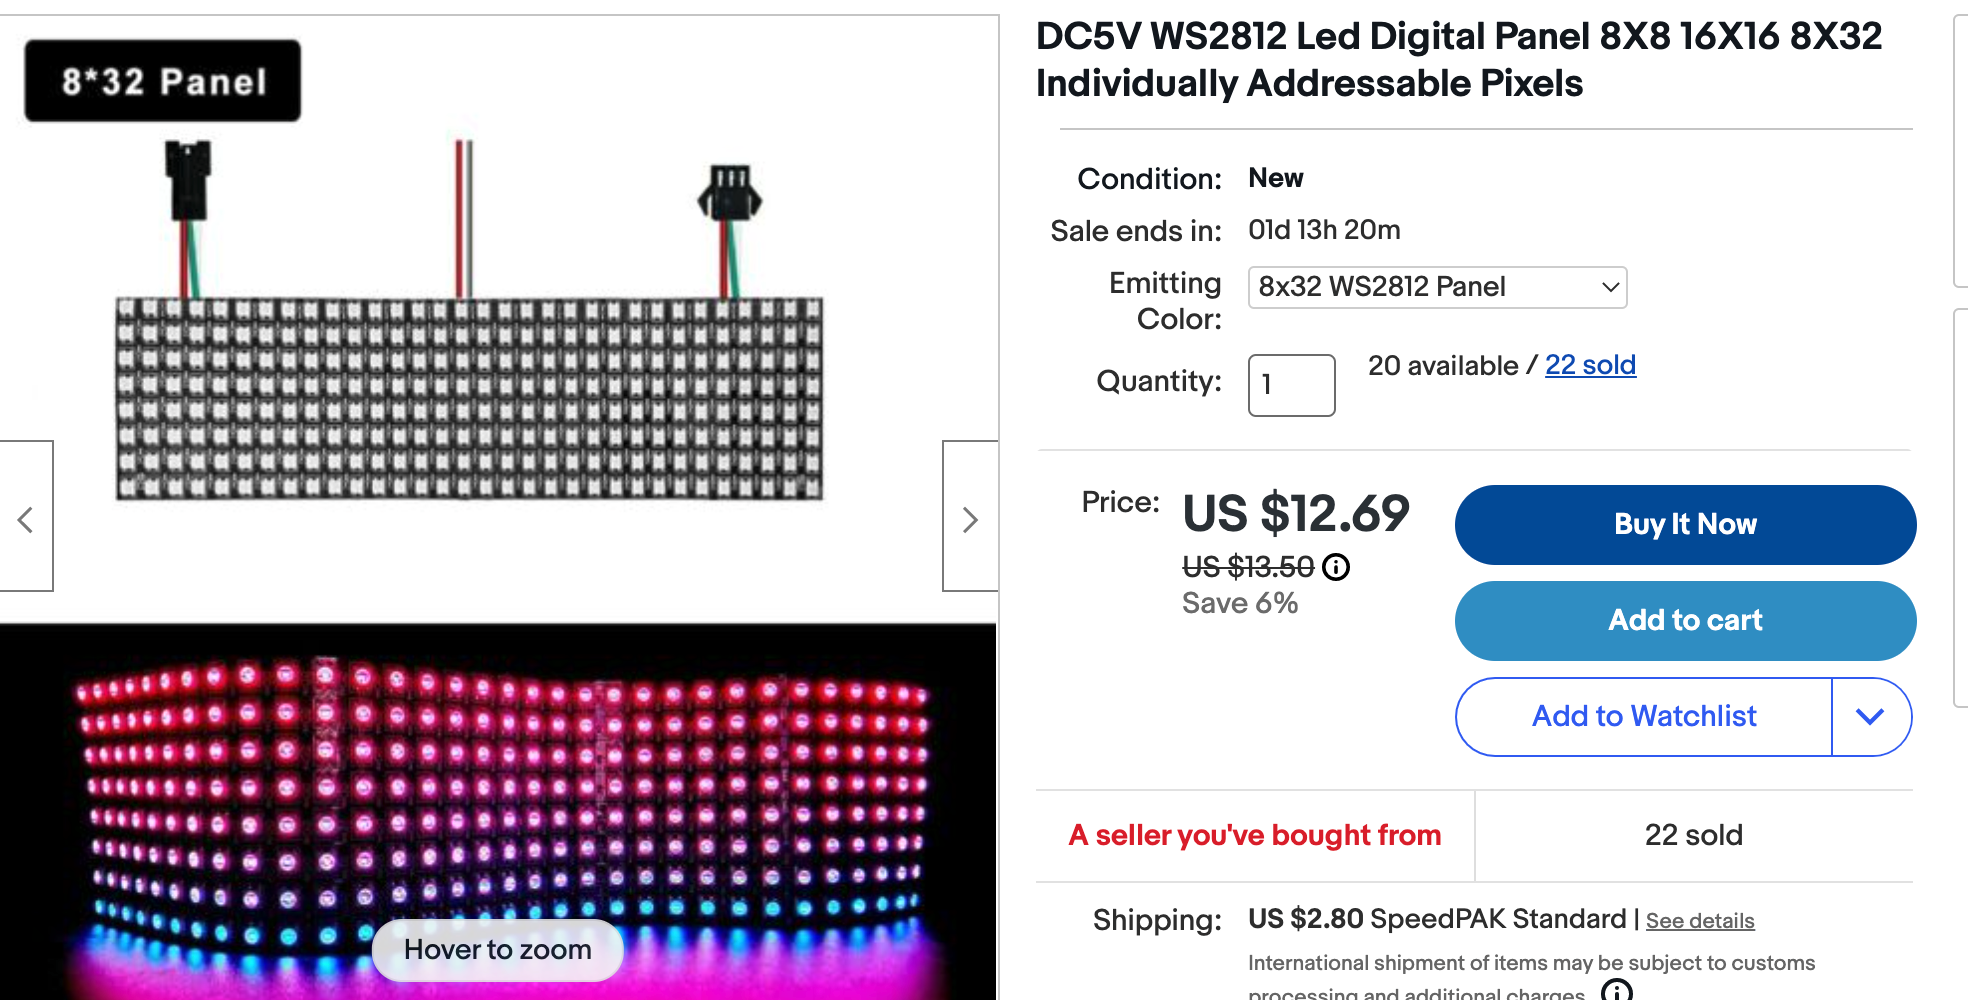
This lab uses MicroPython to control a display made of an 8×32 matrix of WS2812 RGB LEDs. The entire display is controlled by just three wires: a ground (GND), a +5 V power wire, and one serial data signal.
RGB stands for Red, Green, and Blue. Each LED can mix those three colors to make any color you want. WS2812 is the chip inside each LED that lets it receive color commands and pass them on to the next LED in the strip.
You will use the MicroPython built-in NeoPixel library to control the display. Many of the programs from the NeoPixel Basics lesson work here too. The key difference is that you need to convert grid coordinates (x, y) to a single NeoPixel index number.
Purchasing Hardware
You can buy an 8×32 WS2812 RGB LED matrix on eBay for about $12. The same matrix from Adafruit costs about $100. They are also available in 16×16 versions. You can chain multiple displays together to make a larger screen.
The 8×32 display has a total of 8 × 32 = 256 pixels.
Basic Software Setup
Before you can draw on the matrix, you need a function that converts (x, y) grid coordinates to a single NeoPixel index number. This is important because the pixels are not wired in a simple left-to-right, top-to-bottom order. Instead, they follow a serpentine (zigzag) pattern.
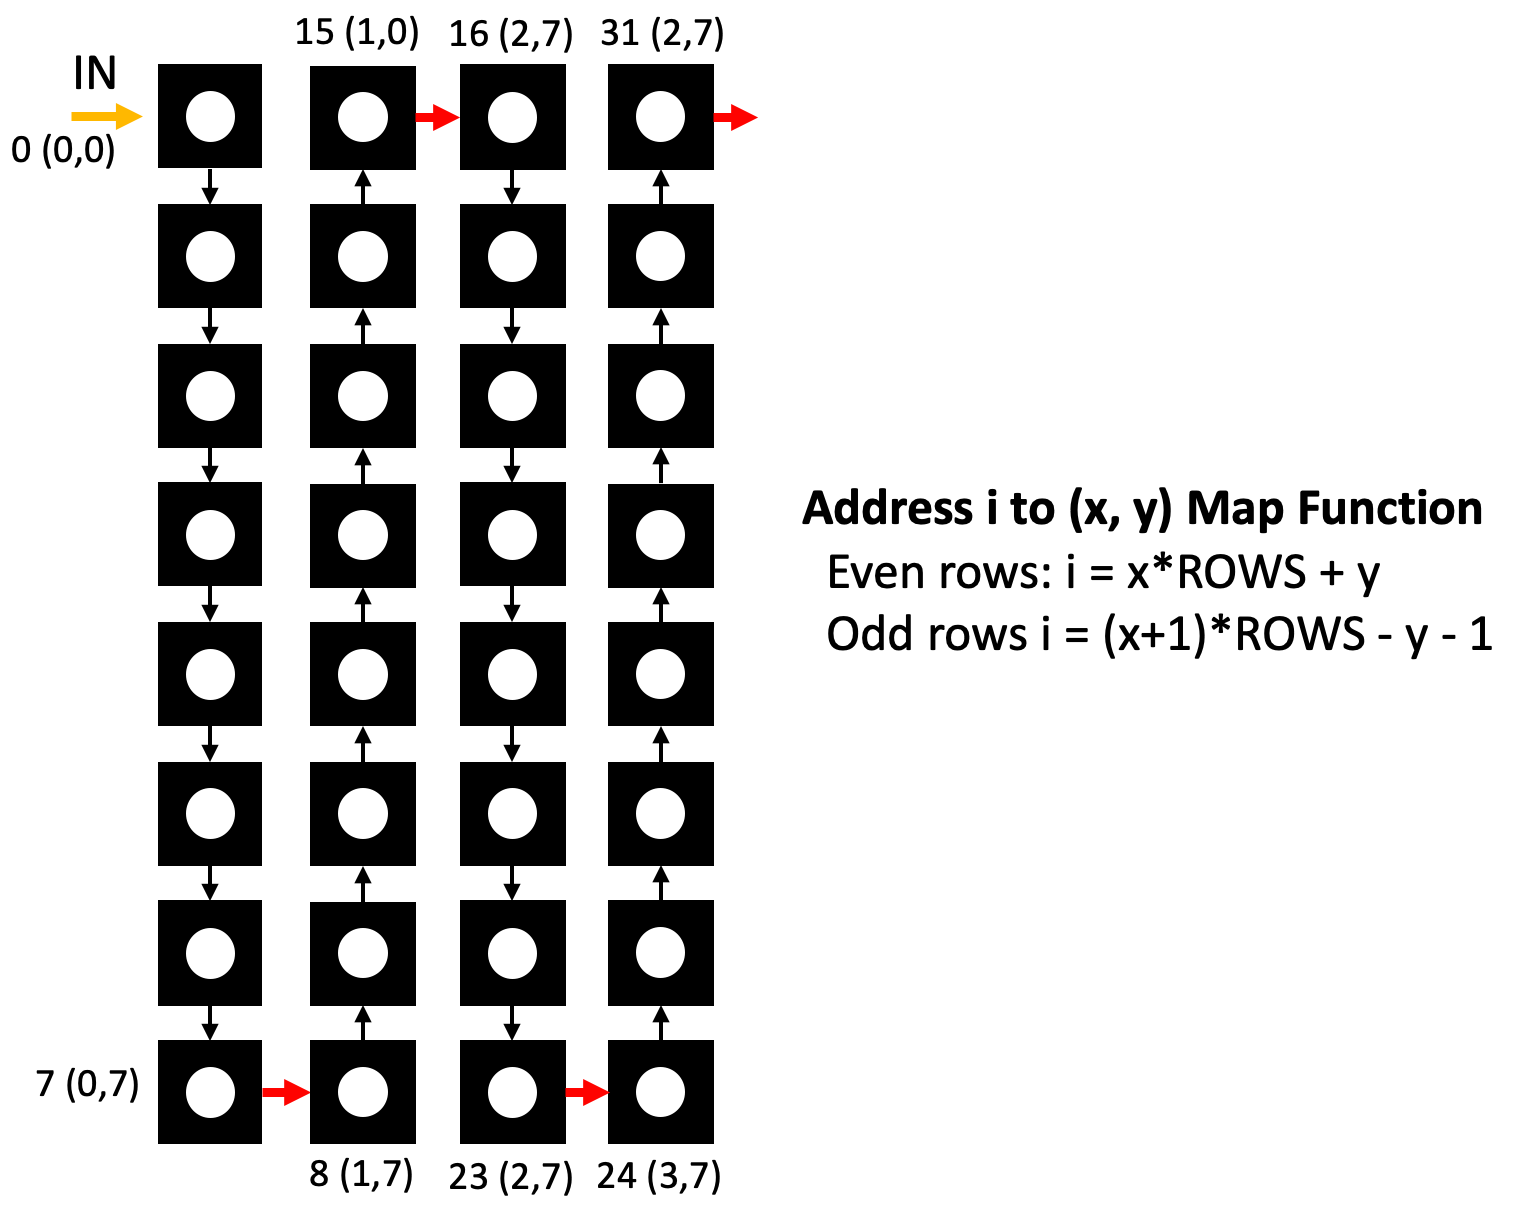
In the serpentine pattern, even columns (0, 2, 4…) run from top to bottom. Odd columns (1, 3, 5…) run from bottom to top. The math for each direction is different.
 1
 2
 3
 4
 5
 6
 7
 8
 9
10
11
12
13
14
15
16
17
18
19 | from machine import Pin # import Pin for the data wire
from neopixel import NeoPixel # import the NeoPixel library
NEOPIXEL_PIN = 0 # data signal goes to GP0
ROWS = 8 # the matrix has 8 rows
COLS = 32 # the matrix has 32 columns
NUMBER_PIXELS = ROWS * COLS # total pixels = 8 × 32 = 256
# Create the NeoPixel object — this reserves memory for all 256 pixels
matrix = NeoPixel(Pin(NEOPIXEL_PIN), NUMBER_PIXELS)
def write_pixel(x, y, color):
"""Turn on one pixel at column x, row y with the given color."""
# Only draw if x and y are inside the display boundaries
if y >= 0 and y < ROWS and x >= 0 and x < COLS:
if x % 2: # odd columns (1, 3, 5…) are wired bottom to top
matrix[(x + 1) * ROWS - y - 1] = color
else: # even columns (0, 2, 4…) are wired top to bottom
matrix[x * ROWS + y] = color
|
What Each Line Does
| Line |
Purpose |
NeoPixel(Pin(NEOPIXEL_PIN), NUMBER_PIXELS) |
Creates a NeoPixel object for 256 LEDs on GP0 |
x % 2 |
Checks if x is odd (1) or even (0) |
(x + 1) * ROWS - y - 1 |
Calculates the index for an odd column (bottom to top) |
x * ROWS + y |
Calculates the index for an even column (top to bottom) |
Key Idea
 Think of the serpentine wiring like a snake slithering through the grid. It goes down column 0, then up column 1, then down column 2, and so on. The
 write_pixel() function works out where each pixel sits in that snake.
Testing Your Write Pixel Function
You can test the write_pixel() function by lighting up one pixel at each corner of the matrix with a different color.
| # Draw one pixel at each corner of the matrix to check the layout
write_pixel(0, 0, (255, 0, 0)) # top-left corner — red
write_pixel(7, 0, (0, 255, 0)) # lower-left corner — green
write_pixel(0, 7, (0, 0, 255)) # top-right corner — blue
write_pixel(7, 7, (255, 255, 255)) # lower-right corner — white
matrix.write() # send all the pixel data to the display
|
What Each Line Does
| Line |
Purpose |
write_pixel(0, 0, (255, 0, 0)) |
Turns on the pixel at (col 0, row 0) with full red |
(255, 0, 0) |
A color tuple: red=255, green=0, blue=0 |
matrix.write() |
Sends all pixel data from the Pico to the display |
Bounce a Ball
This program draws a ball that bounces around the matrix. It changes color every 100 steps.
1
2
3
4
5
6
7
8
9
10
11
12
13
14
15
16
17
18
19
20
21
22
23
24
25
26
27
28
29
30
31
32
33
34
35
36
37
38
39
40
41
42
43
44
45
46
47
48
49
50
51
52
53
54
55
56
57
58
59
60
61
62
63
64
65
66
67
68
69
70 | # Bounce a ball around a NeoPixel Matrix
from machine import Pin # import Pin
from neopixel import NeoPixel # import NeoPixel
from utime import sleep # import sleep for the delay
NEOPIXEL_PIN = 0
ROWS = 8
COLS = 32
NUMBER_PIXELS = ROWS * COLS
strip = NeoPixel(Pin(NEOPIXEL_PIN), NUMBER_PIXELS) # create the NeoPixel object
def clear():
"""Turn off all pixels."""
for i in range(0, NUMBER_PIXELS):
strip[i] = (0, 0, 0) # set every pixel to off (black)
strip.write() # send the update to the display
def write_pixel(x, y, color):
"""Draw one pixel at (x, y) with the given color."""
if y >= 0 and y < ROWS and x >= 0 and x < COLS:
if x % 2: # odd column — wired bottom to top
strip[(x + 1) * ROWS - y - 1] = color
else: # even column — wired top to bottom
strip[x * ROWS + y] = color
def show():
"""Send all pixel data to the display."""
strip.write()
brightness = 1 # keep brightness low so the display does not use too much power
x = 0 # starting column
y = 0 # starting row
dx = 1 # horizontal direction: 1 = right, -1 = left
dy = 1 # vertical direction: 1 = down, -1 = up
counter = 0 # counts steps to change color every 100 steps
while True:
# Reverse direction when the ball hits an edge
if x <= 0:
dx = 1 # hit left edge — move right
if y <= 0:
dy = 1 # hit top edge — move down
if x >= COLS - 1:
dx = -1 # hit right edge — move left
if y >= ROWS - 1:
dy = -1 # hit bottom edge — move up
print(x, y) # print position to the console for debugging
# Change ball color based on the counter value
if counter < 100:
write_pixel(x, y, (brightness, 0, 0)) # red for steps 0–99
elif counter < 200:
write_pixel(x, y, (0, brightness, 0)) # green for steps 100–199
elif counter < 300:
write_pixel(x, y, (0, 0, brightness)) # blue for steps 200–299
show() # update the display
x += dx # move the ball one step horizontally
y += dy # move the ball one step vertically
counter += 1 # count one more step
if counter > 300:
counter = 0 # reset the color counter after 300 steps
if not counter % 150:
x += 1 # nudge the ball sideways every 150 steps to vary the path
sleep(0.1) # wait 100 ms before the next frame
|
You Can Do This!
 The bounce logic can look confusing at first. Remember:
 dx and dy are just direction numbers — either +1 or -1. When the ball hits a wall, you flip the sign. That is all there is to it! You've got this, coder!
Bitmap Library
To draw letters on the matrix, you need a bitmap font. A bitmap font stores each character as a grid of on/off dots. The class below reads a font file called font5x8.bin and draws characters one pixel at a time.
 1
 2
 3
 4
 5
 6
 7
 8
 9
10
11
12
13
14
15
16
17
18
19
20
21
22
23
24
25
26
27
28
29
30
31
32
33
34
35
36
37
38
39
40
41
42
43
44
45
46
47
48
49
50
51
52
53
54
55
56
57
58
59
60
61
62 | # MicroPython basic bitmap font renderer.
# Author: Tony DiCola
# License: MIT License (https://opensource.org/licenses/MIT)
try:
import ustruct # use the smaller MicroPython struct module
except ImportError:
import struct as ustruct # fall back to the standard struct module
class BitmapFont:
def __init__(self, width, height, pixel, font_name='font5x8.bin'):
# Store the display size and the function used to draw one pixel
self._width = width # display width in pixels
self._height = height # display height in pixels
self._pixel = pixel # the function called to draw each pixel
self._font_name = font_name # path to the binary font file
def init(self):
"""Open the font file and read the character size."""
self._font = open(self._font_name, 'rb')
# The first two bytes of the file store the width and height of each character
self._font_width, self._font_height = ustruct.unpack('BB', self._font.read(2))
def deinit(self):
"""Close the font file when done."""
self._font.close()
def __enter__(self):
"""Called automatically when you use 'with BitmapFont(...) as bf:'"""
self.init()
return self
def __exit__(self, exception_type, exception_value, traceback):
"""Called automatically when the 'with' block ends."""
self.deinit()
def draw_char(self, ch, x, y, *args, **kwargs):
"""Draw one character at column x, row y."""
# Skip characters that would be fully off the visible area
if x < -self._font_width or x >= self._width or \
y < -self._font_height or y >= self._height:
return
# Loop through each column of pixels in the character
for char_x in range(self._font_width):
# Find the byte for this column in the font file
self._font.seek(2 + (ord(ch) * self._font_width) + char_x)
line = ustruct.unpack('B', self._font.read(1))[0]
# Loop through each row in this column
for char_y in range(self._font_height):
# Draw a pixel if the bit at this position is 1
if (line >> char_y) & 0x1:
self._pixel(x + char_x, y + char_y, *args, **kwargs)
def text(self, text, x, y, *args, **kwargs):
"""Draw a string of characters starting at (x, y)."""
for i in range(len(text)):
self.draw_char(text[i], x + (i * (self._font_width + 1)), y,
*args, **kwargs)
def width(self, text):
"""Return the total pixel width of a text string."""
return len(text) * (self._font_width + 1)
|
Full Code
This program scrolls a text message across the full 8×32 matrix from right to left.
 1
 2
 3
 4
 5
 6
 7
 8
 9
10
11
12
13
14
15
16
17
18
19
20
21
22
23
24
25
26
27
28
29
30
31
32
33
34
35
36
37
38
39
40
41
42
43
44
45
46
47
48
49
50
51
52
53
54
55
56
57
58
59
60
61
62
63
64
65
66 | # LED Matrix message scroller demo.
import bitmapfont # import the BitmapFont class (save the class above as bitmapfont.py)
import machine # import machine for Pin
import utime # import utime for timing
from neopixel import NeoPixel # import NeoPixel
NEOPIXEL_PIN = 0
ROWS = 8
COLS = 32
NUMBER_PIXELS = ROWS * COLS
matrix = NeoPixel(machine.Pin(NEOPIXEL_PIN), NUMBER_PIXELS)
def fill(color):
"""Set all pixels to the same color."""
for i in range(0, NUMBER_PIXELS):
matrix[i] = color # set every pixel
# Display settings
DISPLAY_WIDTH = 32 # display width in pixels
DISPLAY_HEIGHT = 8 # display height in pixels
SPEED = 20.0 # scroll speed in pixels per second
def show():
"""Send all pixel data to the display."""
matrix.write()
def write_pixel_value(x, y, color):
"""Set one pixel at (x, y) to the given color — handles serpentine wiring."""
if y >= 0 and y < ROWS and x >= 0 and x < COLS:
if x % 2: # odd column — wired bottom to top
matrix[(x + 1) * ROWS - y - 1] = color
else: # even column — wired top to bottom
matrix[x * ROWS + y] = color
def write_pixel(x, y):
"""Draw one white-blue pixel — used by the bitmap font renderer."""
write_pixel_value(x, y, (1, 1, 2)) # dim blue-white color
def scroll_text(message):
"""Scroll a text message across the display from right to left."""
with bitmapfont.BitmapFont(DISPLAY_WIDTH, DISPLAY_HEIGHT, write_pixel) as bf:
pos = DISPLAY_WIDTH # start the message off the right edge
message_width = bf.width(message) # measure how wide the message is
last = utime.ticks_ms() # record the current time in milliseconds
speed_ms = SPEED / 1000.0 # convert pixels/second to pixels/ms
while True:
current = utime.ticks_ms() # get current time
delta_ms = utime.ticks_diff(current, last) # how many ms since last frame
last = current
pos -= speed_ms * delta_ms # move the text left based on elapsed time
if pos < -message_width:
pos = DISPLAY_WIDTH # reset when the message scrolls fully off the left
fill((0, 0, 0)) # clear the display (all black)
bf.text(message, int(pos), 0) # draw the text at the current position
show() # update the display
utime.sleep_ms(20) # short pause to keep the animation smooth
# Light up one pixel to test the display, then scroll a message
write_pixel(0, 0)
show()
scroll_text('MicroPython Rocks')
|
What Each Line Does
| Line |
Purpose |
SPEED = 20.0 |
Sets scroll speed to 20 pixels per second |
utime.ticks_ms() |
Returns the current time in milliseconds |
utime.ticks_diff(current, last) |
Calculates how many ms have passed since the last frame |
pos -= speed_ms * delta_ms |
Moves the text left by the right amount for the time elapsed |
fill((0, 0, 0)) |
Clears all pixels (black = off) |
bf.text(message, int(pos), 0) |
Draws the message at the current scroll position |
Monty's Tip
 Change
 scroll_text('MicroPython Rocks') to your own message. Try your name, a joke, or a countdown — it will scroll across the display automatically!
References
Great Work!
 You drew pixels, bounced a ball, and scrolled a message across a 256-LED matrix! You have learned the full range of non-graphical displays in this section. Keep building, coder!