Web Server with MicroPython
Welcome to Web Servers!
 In this lab you will turn your Pico W into a tiny web server! Other devices on your network can visit it just like a real website.
A web server is a program that listens for requests from browsers and sends back web pages. In the previous lab your Pico W was a client — it asked the internet for data. Now your Pico W will be the server — other devices will ask it for data!
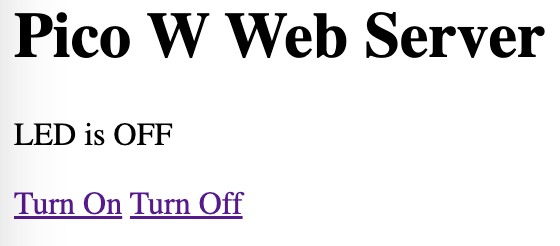
In this lab you will build a web page with two links. One link turns the Pico W's onboard LED on. The other link turns it off. You can control your hardware from any phone or computer on the same WiFi network.
Screen image of the Pico W Web Server:
The Code
This example was adapted from CNX Software.
 1
 2
 3
 4
 5
 6
 7
 8
 9
10
11
12
13
14
15
16
17
18
19
20
21
22
23
24
25
26
27
28
29
30
31
32
33
34
35
36
37
38
39
40
41
42
43
44
45
46
47
48
49
50
51
52
53
54
55
56
57
58
59
60
61
62
63
64
65
66
67
68
69
70
71
72
73
74
75
76
77
78
79
80
81
82
83
84
85 | import network # WiFi library
import socket # library for sending and receiving network data
import time # timing functions
import secrets # your network name and password
from machine import Pin # lets us control hardware pins
# set up the onboard LED as an output pin
led = Pin("LED", Pin.OUT)
wlan = network.WLAN(network.STA_IF) # create WiFi object in station mode
wlan.active(True) # power on the WiFi chip
wlan.connect(secrets.SSID, secrets.PASSWORD) # connect to your network
led_state = "LED is OFF" # track the LED state as text
# the HTML page we will send to browsers — %s will be replaced by led_state
html = """<!DOCTYPE html>
<html>
<head>
<title>Web Server On Pico W </title>
</head>
<body>
<h1>Pico Wireless Web Server</h1>
<p>%s</p>
<a href="/light/on">Turn On</a>
<a href="/light/off">Turn Off</a>
</body>
</html>
"""
# wait up to 10 seconds for the WiFi connection to succeed
max_wait = 10
while max_wait > 0:
if wlan.status() < 0 or wlan.status() >= 3:
break # stop waiting — connection succeeded or failed
max_wait -= 1
print('waiting for connection...')
time.sleep(1) # wait one second before checking again
# if we did not connect (status code 3 = connected), raise an error
if wlan.status() != 3:
raise RuntimeError('network connection failed')
else:
print('We are connected to WiFi access point:', secrets.SSID)
status = wlan.ifconfig()
print('The IP address of the Pico W is:', status[0]) # show our IP address
# set up a network socket — a socket is like a telephone line for data
addr = socket.getaddrinfo('0.0.0.0', 80)[0][-1] # listen on all interfaces, port 80
print('addr:', addr)
server_socket = socket.socket() # create the socket object
server_socket.bind(addr) # attach the socket to our address and port
server_socket.listen(1) # listen for up to 1 connection at a time
print('listening on', addr)
# listen for connections forever
while True:
try:
client, addr = server_socket.accept() # wait for a browser to connect
print('client connected from', addr)
request = client.recv(1024) # read up to 1024 bytes from the browser
request = str(request) # convert the bytes to a string
led_on = request.find('/light/on') # check if the URL says /light/on
led_off = request.find('/light/off') # check if the URL says /light/off
if led_on == 6: # position 6 means it is a valid request path
print("led on")
led.value(1) # turn the LED on
led_state = "LED is ON"
if led_off == 6:
print("led off")
led.value(0) # turn the LED off
led_state = "LED is OFF"
response = html % led_state # fill the %s in the HTML with the current state
client.send('HTTP/1.0 200 OK\r\nContent-type: text/html\r\n\r\n') # send HTTP headers
client.send(response) # send the HTML page
client.close() # close the connection
except OSError as e:
client.close()
print('connection closed')
|
What each line does:
socket.getaddrinfo('0.0.0.0', 80) — sets up to listen on all network interfaces on port 80 (the standard web port)server_socket.bind(addr) — attaches our socket to the address and portserver_socket.listen(1) — tells the socket to wait for incoming browser connectionsserver_socket.accept() — pauses here until a browser connects, then returns the connectionclient.recv(1024) — reads the browser's request (up to 1024 bytes)request.find('/light/on') — searches for that text in the request and returns its position (-1 if not found)html % led_state — replaces the %s placeholder in the HTML with the current LED state textclient.send(...) — sends data back to the browser
Key Idea
 Port 80 is the standard port for web traffic. When you type a web address in your browser without a port number, the browser automatically uses port 80. That is why your Pico W web page is easy to visit — no special port needed!
How to Visit Your Pico W Web Page
- Run the program on your Pico W.
- Look at the Thonny output panel for the IP address.
- Open a web browser on any device connected to the same WiFi network.
- Type the IP address into the address bar and press Enter.
- Click the "Turn On" or "Turn Off" links to control the LED.
Monty's Tip
 The IP address is something like
 10.0.0.70. Type it exactly in your browser — no www. or .com needed. Just the numbers!
References
Creating a basic Raspberry Pi Pico web server
You Built a Web Server!
 You just turned a $6 microcontroller into a working web server! In the next lab you will add color-changing NeoPixel controls to make it even cooler.