Get Weather on an OLED Display
Welcome to the Weather Display!
 In this lab you will display a live weather forecast on a tiny OLED screen connected to your Pico W. This is a real IoT project!
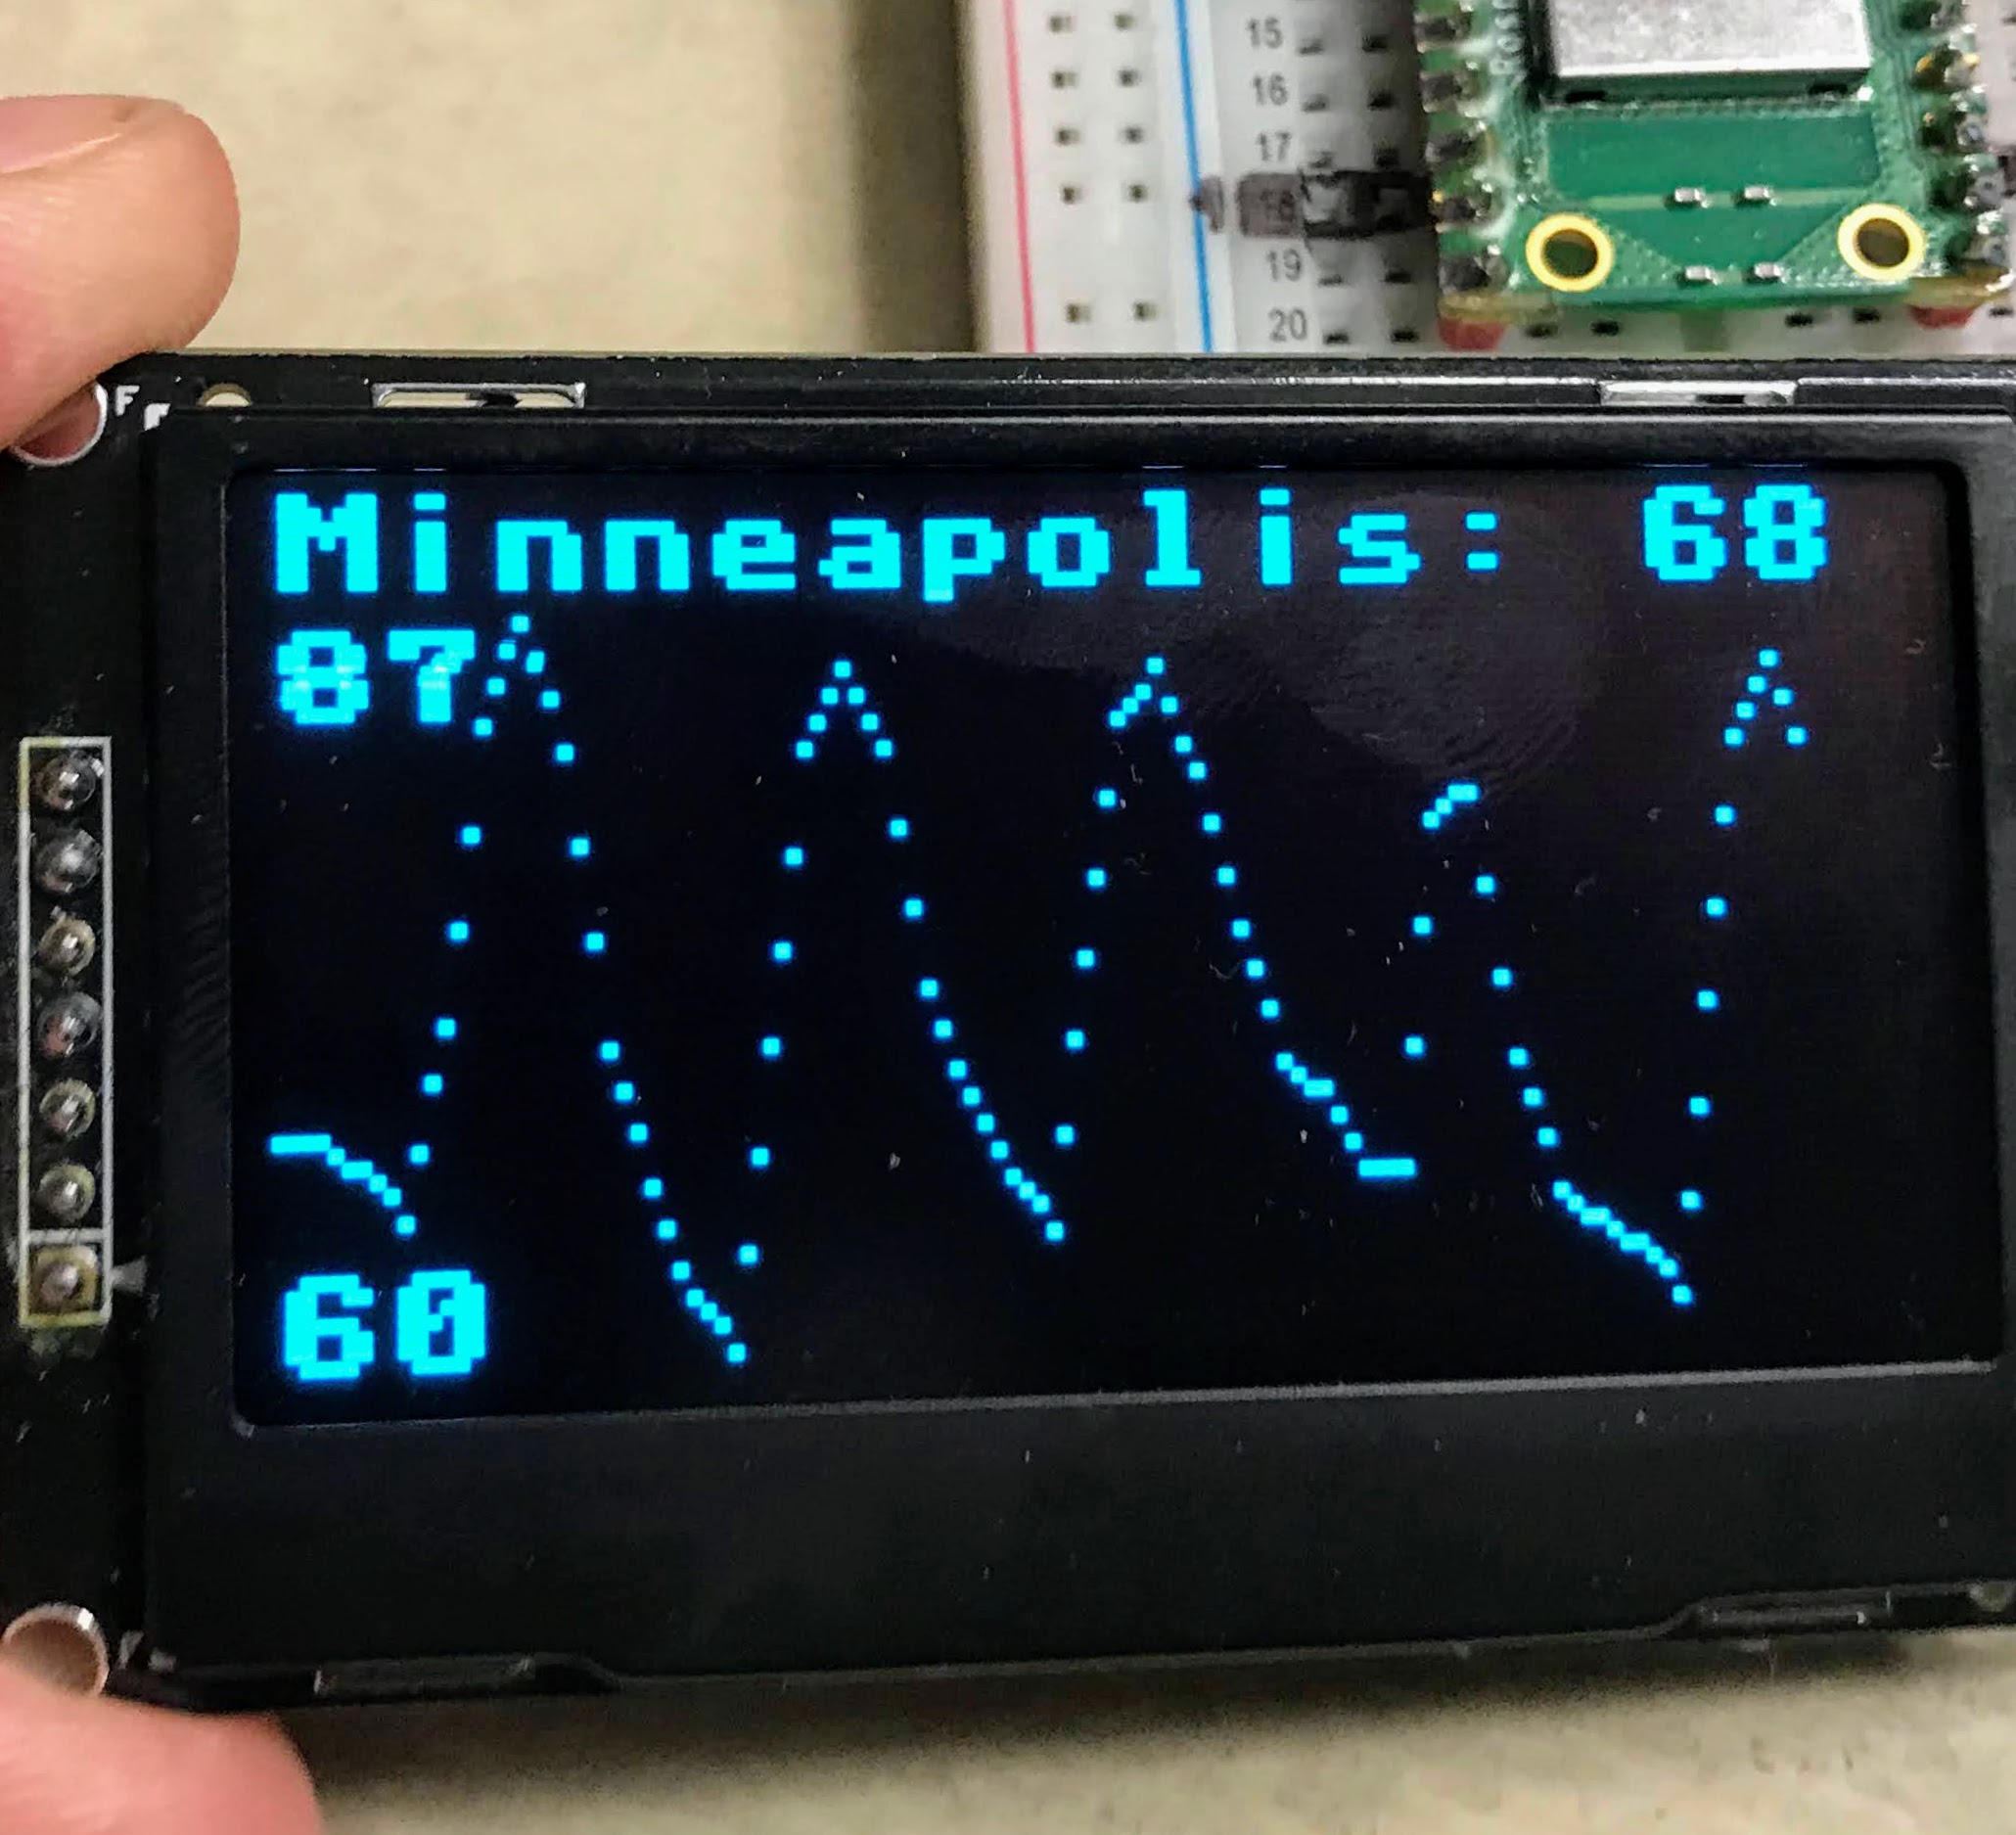
In this lab you will use the Pico W to get a weather forecast and display it on a 128x64 Organic Light-Emitting Diode (OLED) display. The display shows the city name and current temperature on the top row. Below that, it draws a graph of predicted temperatures for the next 120 hours.
This lab is more challenging than the previous one. In the previous lab, Thonny's Plotter did all the graph drawing for us. Here, you will write the scaling and drawing code yourself.
Calling the Weather API
You will use the same method as in the previous lab to get the weather data. The main difference is that you will draw the graph on the OLED instead of printing to Thonny.
Scaling the Data to Fit the Display
The OLED screen is 128 pixels wide and 64 pixels tall. You need to scale your temperature data to fit that space.
The plan:
- Reserve the top 10 pixels for the city name and current temperature.
- Use the remaining 54 pixels of height for the temperature graph.
- Space 40 data points across 120 pixels — so each point is 3 pixels wide.
To scale the temperature values, you need the minimum and maximum temperatures first. The scale factor is:
| scale = graph_height / temperature_range
|
For example, if the temperature range is 27 degrees and the graph is 54 pixels tall, the scale is 2.0 — each degree equals 2 pixels of height.
One tricky part: higher temperatures should be near the top of the screen. But on an OLED, the top of the screen has a lower Y coordinate. So you subtract when placing a point higher:
| y_delta = -round((y - y_next) / 3) # a small positive or negative number for interpolation
|
Key Idea
 On screens, Y=0 is the top and Y=63 is the bottom. So a higher temperature means a lower Y value. Subtracting moves your dot upward — toward warmer temperatures!
The display_weather() Function
 1
 2
 3
 4
 5
 6
 7
 8
 9
10
11
12
13
14
15
16
17
18
19
20
21
22
23
24
25
26
27
28
29
30
31
32
33
34
35
36
37
38
39
40
41
42
43
44
45
46
47
48
49
50
51
52
53
54 | def display_weather():
global weather, city, current_temp # use the global variables set in the main loop
oled.fill(0) # clear the screen (0 = black)
# find the minimum and maximum temperatures in the forecast
min_temp = 120 # start with an impossibly high minimum
max_temp = -50 # start with an impossibly low maximum
for i in range(0, 39):
temp = round(weather['list'][i]['main']['temp'])
if temp < min_temp:
min_temp = temp # update minimum if this temp is lower
if temp > max_temp:
max_temp = temp # update maximum if this temp is higher
min_temp = round(min_temp)
max_temp = round(max_temp)
temp_range = max_temp - min_temp # total temperature range in degrees
graph_height = 54 # pixels available for the graph area
scale = graph_height / temp_range # how many pixels per degree
print('min/max/range/scale:', min_temp, max_temp, temp_range, scale)
# display city name, current temp, and scale labels
oled.text(city + ': ' + str(current_temp), 0, 0, 1) # top row: city and temp
oled.text(str(min_temp), 0, 57, 1) # bottom-left corner: minimum temperature
oled.text(str(max_temp), 0, 10, 1) # just below the top row: maximum temperature
max_points = 39 # number of forecast intervals to graph
# draw a dot for each time period
print('Date Tmp TNx Y Y2 Del')
for i in range(0, max_points):
temp = round(weather['list'][i]['main']['temp'])
x = i * 3 # each point is 3 pixels wide
y = 63 - round((temp - min_temp) * scale) # calculate vertical position
oled.pixel(x, y, 1) # draw the dot at (x, y)
# interpolate two more dots between this point and the next
if i < max_points:
temp_next = round(weather['list'][i+1]['main']['temp'])
y_next = 63 - round((temp_next - min_temp) * scale)
y_delta = -round((y - y_next) / 3) # step size for interpolation
# debugging output: fixed-width columns for easier reading
print(weather['list'][i]['dt_txt'][0:13],
'{: 3.3d}'.format(temp),
'{: 3.3d}'.format(temp_next),
'{: 3.3d}'.format(y),
'{: 3.3d}'.format(y_next),
'{: 3.3d}'.format(y_delta))
oled.pixel(x + 1, y + y_delta, 1) # 1/3 of the way to the next point
oled.pixel(x + 2, y + 2 * y_delta, 1) # 2/3 of the way to the next point
oled.show() # send the pixel buffer to the physical display
|
What each line does:
oled.fill(0) — clears all pixels to blackscale = graph_height / temp_range — calculates how many pixels equal one degree of temperaturey = 63 - round((temp - min_temp) * scale) — converts temperature to a Y pixel position (63 is the bottom)oled.pixel(x, y, 1) — turns on one pixel at position (x, y)y_delta — the amount to move up or down each pixel-step between two data pointsoled.show() — sends the pixel data from memory to the display
The Main Loop
The main loop runs forever. It fetches fresh weather data every hour and redraws the display.
| while True:
weather = urequests.get(url).json() # fetch the weather data from the API
city = weather['city']['name'] # extract the city name
current_temp = round(weather['list'][0]['main']['temp']) # get the current temperature
display_weather() # draw everything on the OLED screen
print('Going to sleep for one hour')
sleep(3600) # wait one hour (3600 seconds) before updating again
|
Full Sample Code
1
2
3
4
5
6
7
8
9
10
11
12
13
14
15
16
17
18
19
20
21
22
23
24
25
26
27
28
29
30
31
32
33
34
35
36
37
38
39
40
41
42
43
44
45
46
47
48
49
50
51
52
53
54
55
56
57
58
59
60
61
62
63
64
65
66
67
68
69
70
71
72
73
74
75
76
77
78
79
80
81
82
83
84
85
86
87
88
89
90
91
92
93
94
95
96
97
98
99
100
101
102
103
104
105
106
107
108
109 | import network
import ssd1306 # OLED display driver
import secrets
import urequests
from utime import sleep, ticks_ms, ticks_diff
# startup
print('Connecting to WiFi Network Name:', secrets.SSID)
wlan = network.WLAN(network.STA_IF) # create WiFi object in station mode
wlan.active(True) # power on the WiFi chip
# set up the OLED display over SPI
WIDTH = 128
HEIGHT = 64
SCK = machine.Pin(2) # clock pin
SDL = machine.Pin(3) # data pin (MOSI)
spi = machine.SPI(0, baudrate=100000, sck=SCK, mosi=SDL)
CS = machine.Pin(0) # chip select pin
DC = machine.Pin(1) # data/command pin
RES = machine.Pin(4) # reset pin
oled = ssd1306.SSD1306_SPI(WIDTH, HEIGHT, spi, DC, RES, CS)
oled.poweron() # turn on the OLED screen
def display_startup(counter):
oled.fill(0)
oled.text('Running startup', 0, 10, 1)
oled.text('Connecting to', 0, 20, 1)
oled.text(secrets.SSID, 0, 30, 1) # show the network name
oled.text(str(counter), 0, 40, 1) # show how many seconds have passed
oled.show()
def display_status(counter):
oled.fill(0)
oled.text('n:' + secrets.SSID, 0, 0, 1) # show network name
oled.text('t:', 0, 10, 1)
oled.text(str(connection_time) + ' ms', 15, 10, 1) # show connection time
oled.show()
def display_weather():
global weather, city, current_temp
oled.fill(0)
min_temp = 120
max_temp = -50
for i in range(0, 39):
temp = round(weather['list'][i]['main']['temp'])
if temp < min_temp:
min_temp = temp
if temp > max_temp:
max_temp = temp
min_temp = round(min_temp)
max_temp = round(max_temp)
temp_range = max_temp - min_temp
graph_height = 54
scale = graph_height / temp_range
print('min/max/range/scale:', min_temp, max_temp, temp_range, scale)
oled.text(city + ': ' + str(current_temp), 0, 0, 1)
oled.text(str(min_temp), 0, 57, 1) # minimum temperature at bottom left
oled.text(str(max_temp), 0, 10, 1) # maximum temperature near top
max_points = 39
print('Date Tmp TNx Y Y2 Del')
for i in range(0, max_points):
temp = round(weather['list'][i]['main']['temp'])
x = i * 3 # x position: 3 pixels per data point
y = 63 - round((temp - min_temp) * scale) # y position: higher temp = lower y
oled.pixel(x, y, 1) # draw main dot
if i < max_points:
temp_next = round(weather['list'][i+1]['main']['temp'])
y_next = 63 - round((temp_next - min_temp) * scale)
y_delta = -round((y - y_next) / 3) # interpolation step size
print(weather['list'][i]['dt_txt'][0:13],
'{: 3.3d}'.format(temp),
'{: 3.3d}'.format(temp_next),
'{: 3.3d}'.format(y),
'{: 3.3d}'.format(y_next),
'{: 3.3d}'.format(y_delta))
oled.pixel(x + 1, y + y_delta, 1) # interpolated dot 1
oled.pixel(x + 2, y + 2 * y_delta, 1) # interpolated dot 2
oled.show()
start = ticks_ms()
if not wlan.isconnected():
wlan.connect(secrets.SSID, secrets.PASSWORD)
print("Waiting for connection...")
counter = 0
while not wlan.isconnected():
sleep(1)
print(counter, '.', sep='', end='')
counter += 1
display_startup(counter)
delta = ticks_diff(ticks_ms(), start)
base = 'http://api.openweathermap.org/data/2.5/forecast?units=imperial&'
location = '5037649' # Minneapolis, MN USA — change to your city ID
url = base + 'id=' + location + '&appid=' + secrets.appid
while True:
weather = urequests.get(url).json() # fetch fresh weather data
city = weather['city']['name'] # store city name globally
current_temp = round(weather['list'][0]['main']['temp']) # store current temp globally
display_weather() # redraw the OLED display
print('Going to sleep for one hour.')
sleep(3600) # wait one hour before the next update
|
Sample Debugging Output
The display_weather() function prints a table to help you check the math. Here is what that table looks like:
 1
 2
 3
 4
 5
 6
 7
 8
 9
10
11
12 | Connecting to WiFi Network Name: anndan-2.4
min/max/range/scale: 60 87 27 2.0
Date Tmp Tnx Y Y2 Del
2022-08-13 03 68 68 47 47 0
2022-08-13 06 68 68 47 47 0
2022-08-13 09 68 65 47 53 2
2022-08-13 12 65 72 53 39 -5
2022-08-13 15 72 83 39 17 -7
2022-08-13 18 83 87 17 9 -3
2022-08-13 21 87 82 9 19 3
...
Going to sleep for one hour
|
Each row shows: the date and time, the current temperature, the next temperature, the Y pixel position, the next Y position, and the interpolation step.
Amazing Work!
 You built a real IoT weather station! Your Pico W fetches live data and displays it on a screen. In the next lab you will fetch the exact time from an internet clock server.