Drawing Rectangles
Rectangles are the workhorse shape of this kit — not because robot faces are boxy, but because a filled rectangle is how you erase on a display with no frame buffer. Almost every animation in these labs is built on that one idea.
This driver splits what framebuf combined into a single call:
1 2 | |
There is no separate "erase" command anywhere in this kit. Drawing in black is erasing, and
fill_rect(..., BLACK) is the fastest eraser you have, because it is the one call that sends long
runs of identical pixels.
The Fastest Eraser You Have
 Wiping my whole screen means sending 115,200 bytes. Wiping just the box around my mouth might be 8,000. Same result on the glass, one-fourteenth of the work — and that is the difference between a smooth animation and a flicker.
Sample Program Code
This program draws a border pulled well inside the safe radius, a retro blocky face with square eye sockets, and a mouth bar with teeth erased out of it in black.
1 2 3 4 5 6 7 8 9 10 11 12 13 14 15 16 17 18 19 20 21 22 23 24 25 | |
Here's what that program draws on the display:
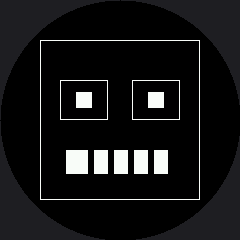
The Teeth Are the Lesson
Those teeth were never drawn. The program painted one solid white bar and then painted four black bars on top of it, and what is left over reads as a mouthful of teeth.
That is the same layering trick as the catchlight in the pixel lab, and it is how nearly every detail in this kit gets made: draw the big shape, then take pieces back out with black.
| Goal | Approach |
|---|---|
| Solid block of color | fill_rect(x, y, w, h, color) |
| Outline | rect(x, y, w, h, color) — no fill flag exists |
| Erase a region | fill_rect(x, y, w, h, BLACK) |
| Carve detail out of a shape | Draw the shape, then draw black on top |
| Erase everything | display.fill(BLACK) — the most expensive call in the kit |
One Call Takes the Mouth Back
 Add
Add display.fill_rect(66, 150, 108, 24, BLACK) at the end. The mouth disappears and nothing else on screen moves. That single line is the trick the Only Redraw What Changed lab is built on.
Things to Try
- Widen the border to
display.rect(10, 10, 220, 220, WHITE)and run it again. The corners disappear and you are left with four disconnected arcs. - Erase just the mouth, as in the tip above, and confirm that the eyes are untouched.
- Change the tooth spacing in the
range(88, 174, 20)step from 20 to 14. More teeth, no new code — the loop does the counting. - Time the two erasers. Compare
display.fill(BLACK)against the mouth-sizedfill_rect()withticks_us(). Write both numbers down; you will want them again at lab 29.
References
- Drawing Pixels — the same layering idea, at the smallest possible scale
- Only Redraw What Changed — where erasing one box instead of the screen becomes a measured optimization
- Eye Scanner — the first animation that depends on erasing a box