Drawing Circles
A circle is just an ellipse whose horizontal and vertical radii are equal, so shapes.circle() is
a two-line wrapper around shapes.ellipse(). Circles can be drawn as an
outline or filled, in either color, which lets you put a dark shape on a light background or a
light shape on a dark one — on a screen 2.25 times the size of the 1.2" kit's.
1 2 | |
That second one is new, and it is the shape a round display was made for.
Sample Program Code
This program draws all four combinations of background and fill so you can compare them at once — and it lays them out in a diamond rather than a 2 by 2 grid, because the four corners of a grid on a round screen are exactly the four places you cannot see.
1 2 3 4 5 6 7 8 9 10 11 12 13 14 15 16 17 18 19 20 21 22 23 24 25 26 27 28 29 30 31 32 33 34 35 36 37 38 39 | |
Here's what that program draws on the display:
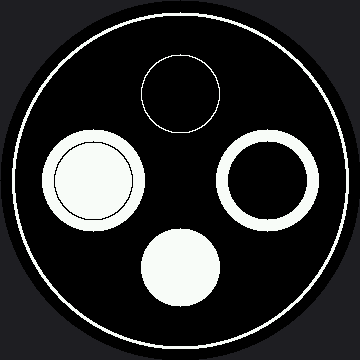
The Four Combinations
The whole display starts out black, so the top and bottom circles need no background at all. To put a white background behind a black circle, draw a slightly larger filled white circle first and then draw the black one on top of it — exactly the same trick as on the smaller kit, just with a 12 px patch instead of an 8 px one.
| Position | Background | Circle color | Fill |
|---|---|---|---|
| Top | Black | White | Outline |
| Bottom | Black | White | Filled |
| Left | White patch | Black | Outline |
| Right | White patch | Black | Filled |
A Diamond, Not a Grid
 Four shapes in a 2 by 2 grid would put one in each corner — and my screen has no corners. Rotate the whole arrangement 45 degrees and every shape lands where there is glass. Round screens want radial layouts, whether they're 240 px across or 360.
The Ring Around the Rim
That thin outer circle is shapes.ring() drawn at config.SAFE_RADIUS, which is 168 on this
kit — and it is the one shape here that could not have existed on a rectangular display. It follows
the bezel exactly, which makes it useful as more than decoration: anything that crosses it is in
danger, and anything well inside it is safe.
Notice the call to ring() needed no change at all when this lab was ported from the 1.2" kit,
because it was never written as a literal number — it asks config for SAFE_RADIUS, so it moved
from 112 out to 168 on its own. That is the whole argument for naming a constant instead of typing
one, made real: one line of code, unedited, correct on two different screens.
Do the Arithmetic Before You Move Anything
 A circle at
 OFFSET with radius RADIUS reaches OFFSET + RADIUS pixels from the center. Compare that sum to config.SAFE_RADIUS — 168 — before you run it, and you will stop being surprised by disappearing shapes.
Things to Try
- Push
OFFSETfrom 87 up to 120 and run it again. The circles start crossing the safe ring, and each one loses its outer edge first. The two with white patches cross it before the other two do, because a patch reachesPATCHpixels further out than the circle drawn on it. - Work out the largest
RADIUSa circle atOFFSET = 87can have before it touches the safe ring. (Add the two numbers and compare withconfig.SAFE_RADIUS.) Check your answer on the glass, then do it again for the two circles that sit on a patch, which needRADIUS + PATCHto fit instead ofRADIUS. - Nudge the safe radius yourself.
config.SAFE_RADIUSwas scaled from the 1.2" kit's panel and hasn't been measured against this one's real bezel yet. The ring this lab draws is the measuring tool — on real hardware, watch where it actually falls and adjustSAFE_RADIUSinconfig.pyuntil the ring just clears the rim. Every other lab in the kit inherits your answer. - Build an eye. A filled white circle with a smaller black circle on top of it is an eye — you have already drawn one twice in this lab without calling it that.
References
- Drawing Ellipses — the general case, and where the quadrant codes come from
- Your First Face — the first lab that turns two circles into a pair of eyes
- Screen Coordinates — where
SAFE_RADIUScomes from - Drawing Circles on the 1.2" kit — the same lab on the smaller 240×240 screen, where
SAFE_RADIUSis 112